14. Go调度器系列解读(一):什么是 GMP?-灵析社区
 cathoy
前言
紧接 13. 入门 go 语言汇编,看懂 GMP 源码 文章,我们继续开启 Go 调度器解读之旅。通过对 GMP 源码的阅读,理解了很多 Go 调度器的运行和调度规则,源码有六千行之多(还不包括汇编在内),这是一个庞大的工程,坚持下去,定会收获颇丰。Go 调度器探索共分为三篇文章进行讲述,今天就先分享第一篇相关文章:《什么是 GMP》,在这篇文章中,你可以学习到以下内容:
- Go 调度模型的发展史;
- G、M、P 相关概念和作用;
- G、M、P 实体以及其他对象之间的关系;
- G、M、P 源码结构体中重要的字段含义;
- G、M、P 对象的启动和初始化;
- GMP 关于一个线程的基本调度流程;
- G、M、P 的状态流转。
Go 版本 1.20.7、linux 系统
源码地址如下:
src/runtime/runtime2.go
src/runtime/proc.go
src/runtime/asm_amd64.s
1.Go 调度模型的发展史
Go 语言有强大的并发能力,能够简单的通过 go 关键字创建大量的轻量级协程 Goroutine,帮助程序快速执行各种任务,这都源自于强大而复杂的 Go 调度器。本文基于 Go 1.20.7 版本进行调度器源码解读 ;Go 调度模型不可能一开始就是这么复杂,肯定经历了很长时间的优化和完善,才获得了今天的成果。只有了解了 Go 调度模型的发展历史,才能够更好的帮助我们理解现在的调度原理。
1.1 Go 协程的产生
我们都知道在多进程/多线程时代,CPU 内核有着自己的调度规则,给系统提供了并发处理的能力,但也存在着很多的缺点:
- 进程、线程都拥有着很多的资源,它们的创建、切换和销毁都会占用大量的 CPU 资源;
- 在如今的高并发业务场景下,为每一个任务创建一个线程是不现实的,每个线程大约需要 4MB 内存,大量的线程会导致高内存占用问题。
然而这些缺点是作为应用层的我们不能插手和改变的,应用层唯一能做的就是减少线程的创建和切换,于是就产生了“协程”的概念:协程指的是用户级别的线程。这个概念怎么理解呢,我们看一张图:

在这张图中,我们可以了解到 CPU 管辖的地段可以被称之为内核空间,这里我们的用户程序是进不去的,只能通过系统调用完成交互;而应用程序所在的地方,就是用户空间,这里我们是拥有绝对的调度权的。用户线程(协程)通过绑定内核线程就可以实现程序的运行,所以可以通过合理的调度用户线程进而提升 CPU 的利用率。
于是便产生了协程,在 Go 中被称为 goroutine,是 Go 语言实现的用户态线程,主要用来解决内核线程太“重”的问题,所谓的太重,主要表现在以下两个方面:(为了区分表示,后边文章内容中,线程仅代表内核线程,goroutine 代表 Go 中的协程,也就是用户态线程)
- 创建和切换太重:线程的创建和切换都需要进入内核,而进入内核所消耗的性能代价比较高,开销较大;
- 内存使用太重:
而相对的,用户态的 goroutine 则轻量得多:
- goroutine 是用户态线程(协程),其创建和切换都在用户代码中完成而无需进入操作系统内核,所以其开销要远远小于线程的创建和切换;
- goroutine 启动时默认栈大小只有 2k,这在多数情况下已经够用了,即使不够用,goroutine 的栈也会自动扩大,如果栈太大了过于浪费,它还能自动收缩,这样既没有栈溢出的风险,也不会造成栈内存空间的大量浪费。
正是因为 Go 语言中实现了如此轻量级的 goroutine,才使得在 Go 程序中,可以轻易的创建成千上万甚至上百万的 goroutine 出来并发的执行任务,而不用太担心性能和内存等问题。
1.2 GM 模型
当然,产生 goroutine 后,下一个要考虑的问题就是 goroutine(G) 和线程(M)的映射关系,有三种映射方式:
- N:1 关系:N 个 goroutine 使用一个线程,goroutine 之间可以在用户态完成切换,不用进入内核,切换十分轻量;缺点是每个 Go 程序都用不了硬件的多核加速能力,并且 G 阻塞会导致跟 G 绑定的 M 阻塞,其他 G 也用不了 M 去执行自己的程序了。
- 1:1 关系:1 个 goroutine 使用一个线程,直接丧失 goroutine 存在的意义。
- N:M 关系:N 个 goroutine 共同使用 M 个线程,这必然得产生一个中间层,我们称之为调度器,负责 goroutine 和 线程 M 之间的调度,这种方式是最复杂,也是最有效的映射方式,不仅可以使 goroutine 之间在用户态的完成切换,还可以最大限度利用硬件的多核加速能力。
Go 调度器最原始的模型便是 GM 模型,采用 N:M 的映射方式,我们了解一下这种模型的实现方式:

GM 模型使用全局唯一的 goroutine 运行队列,对所有 goroutine 进行管理和调度,线程(M)通过对全局运行队列加锁的方式,对 G 进行获取和执行,该模型存在以下缺点:
- G 的创建、调度都需要对全局运行队列加互斥锁,会造成激烈的锁竞争,全局锁带来的锁竞争导致的性能下降(最主要的缺陷);
- M 会频繁交接 G,导致额外开销、性能下降;
- 每个 M 都得能执行任意的 runnable 状态的 G;
- 新产生的 G 也需要被加入到全局队列中,无法保证在产生它的 M 中执行,每个 M 都需要处理内存缓存,导致大量的内存占用并影响数据局部性;
1.3 GMP 模型
为了解决 GM 模型的缺点,在已有 G、M 的基础上,引入了 P 处理器,由此产生了当前 Go 中经典的 GMP 调度模型:
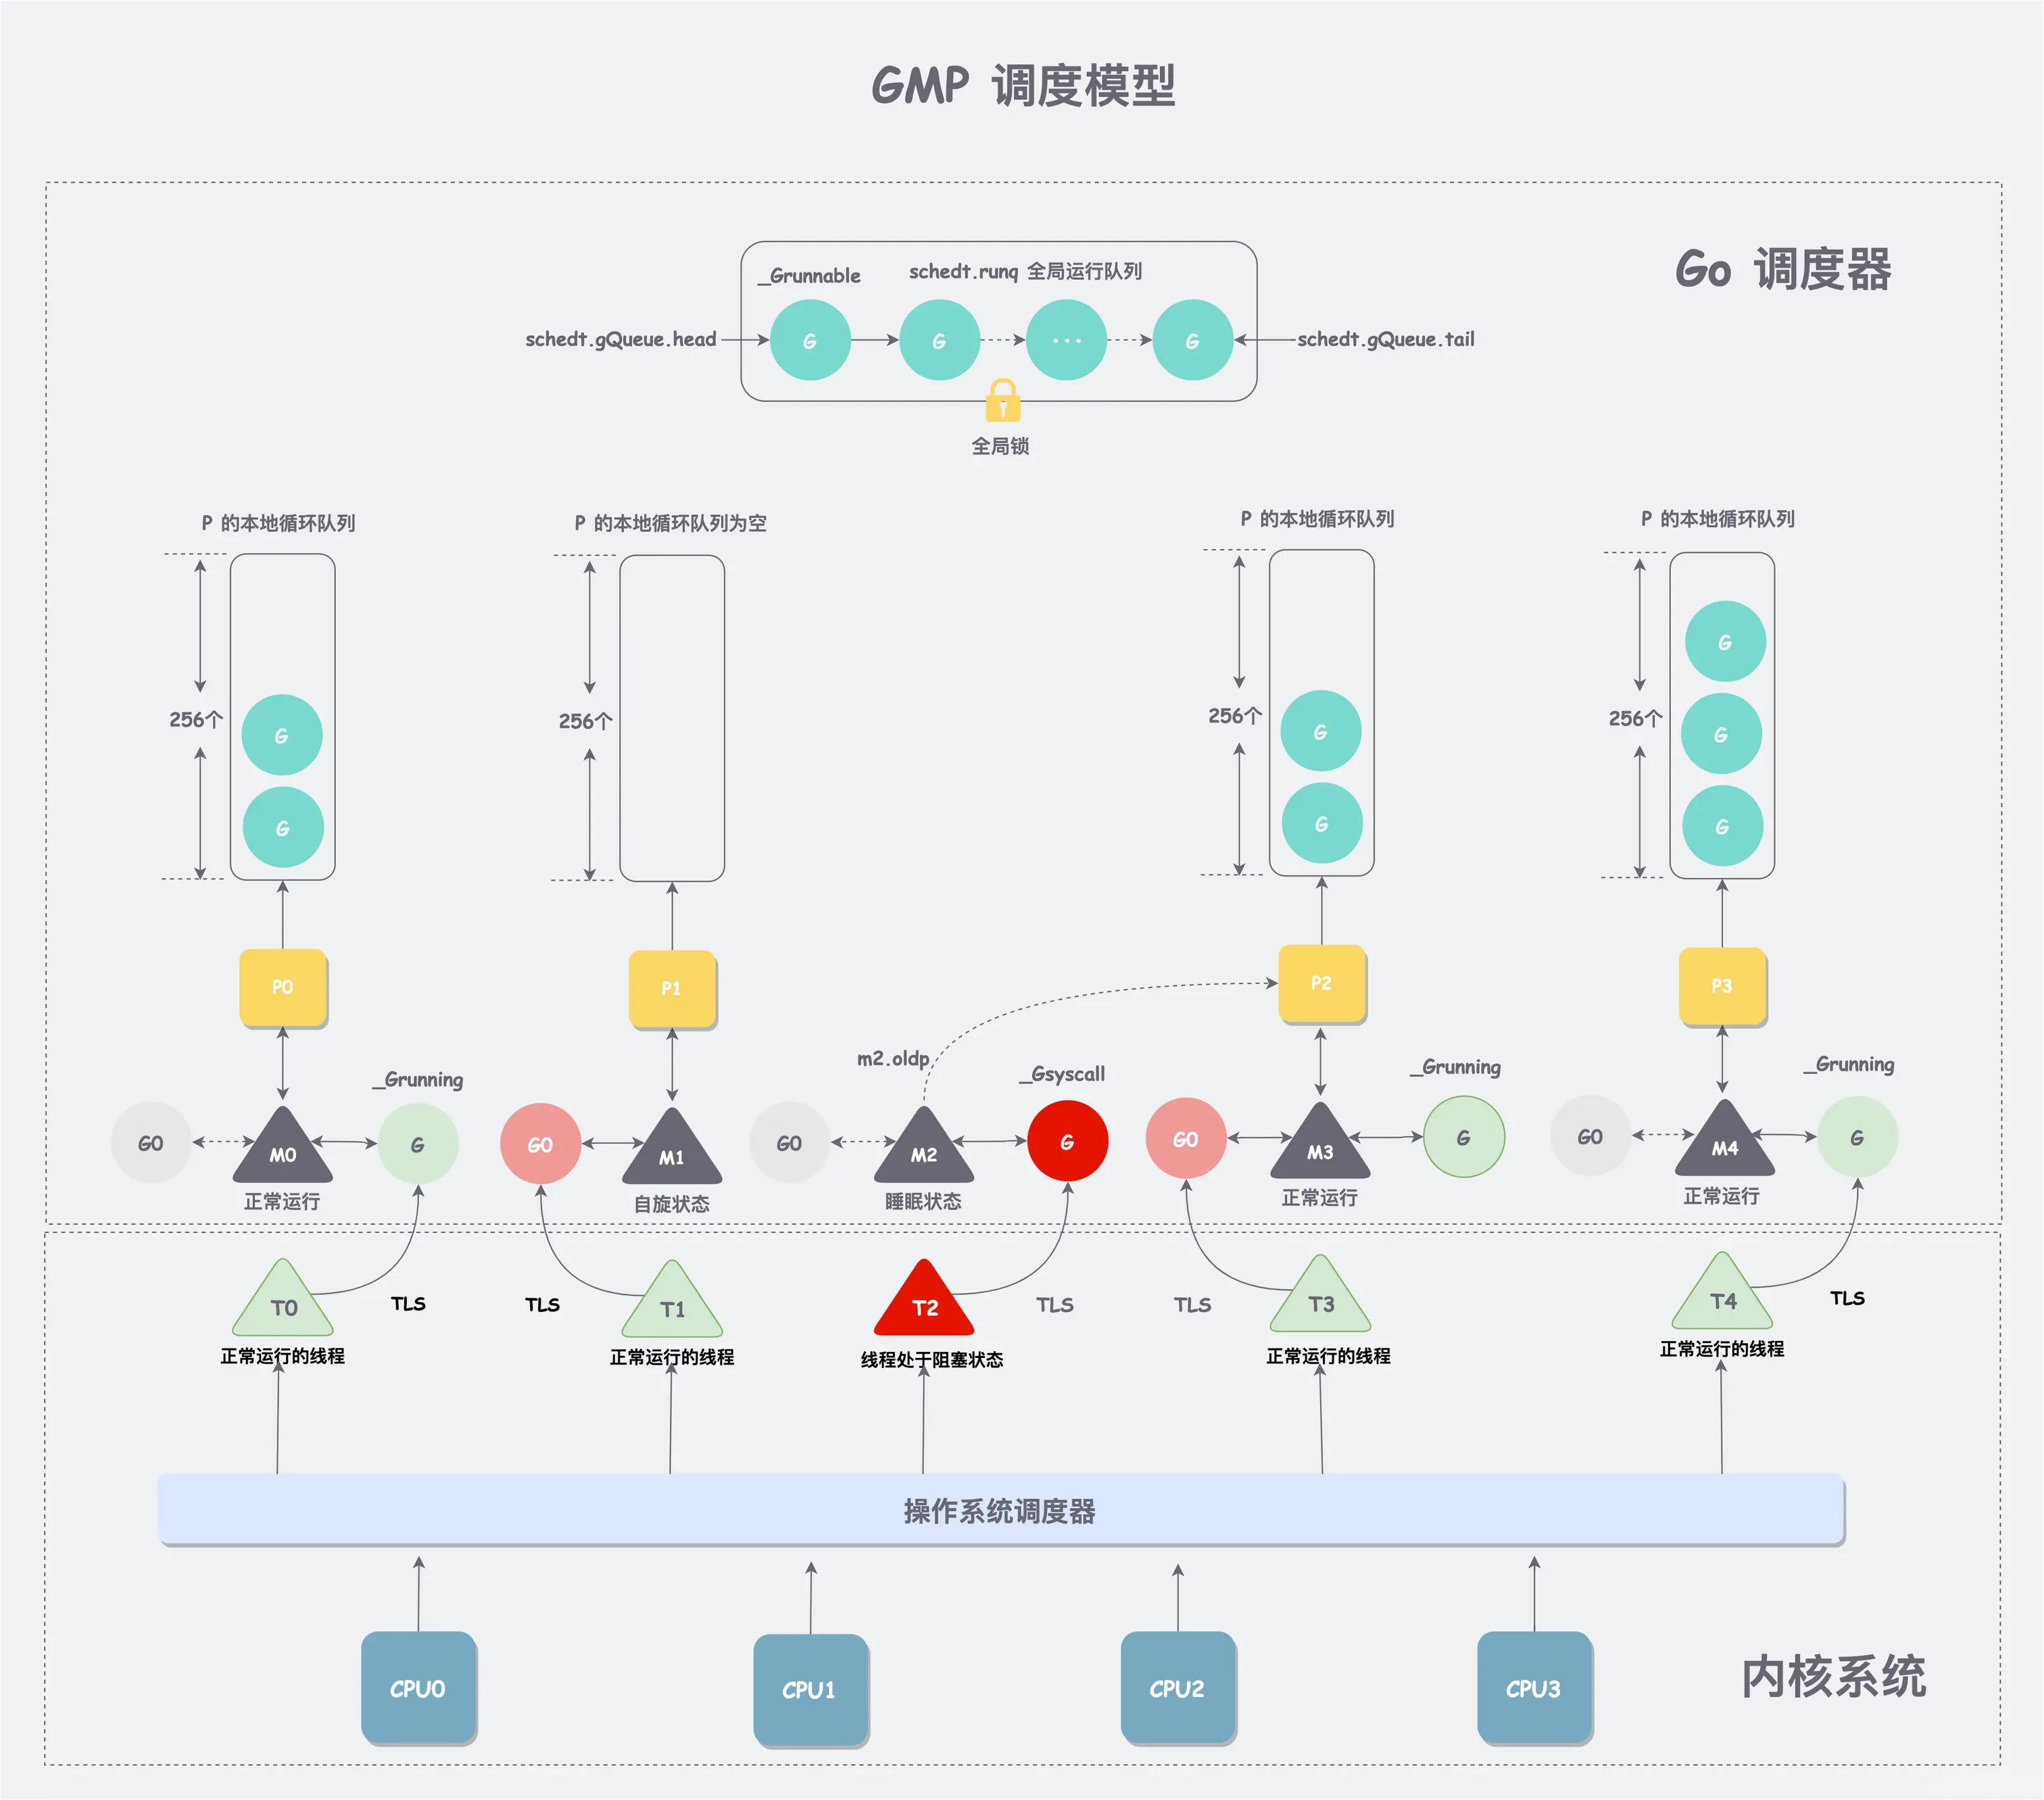
G、M、P 概念理解:
- G:goroutine,对用户态线程的抽象,可以在 M 上运行,存储在全局队列和 P 上的本地队列(大小 256)中。
- M:对操作系统的线程的抽象,一个 M 代表一个线程,Go 程序启动时会设置 M 最大数量(默认 10000),一个 M 最多可以绑定一个 P,M 发生阻塞会释放 P,P 可以与其他 M 建立绑定,如果不存在空闲的 M,可以进行创建新的 M。
- P:逻辑处理器,是对 cpu 核的抽象,可以简单理解为一个 p 就是一核。可以通过设置 GOMAXPROCS 来设置 P 的数量。其实 P 的数量,控制了并行的能力,一个 M 绑定一个 P, 如果 M 数量大于 P,多出来的 M 就只有阻塞排队。所以最好就是有几核就设置几个 P。
GMP 模型增加了 P 这一层,解决了 GM 的缺陷:
- P 中保存了 goroutine 的本地队列,可以通过 CAS 的方式实现无锁访问,工作线程 M 优先使用自己的局部运行队列中的 G,只有必要时才会去访问全局运行队列,这大大减少了锁冲突,提高了大量 G 的并发性。
- M 创建新的 G 后,会优先将其存储到与自己绑定的 P 的本地队列中,从而解决了局部性问题,M 只需要处理和自己相关的缓存信息,减少资源的浪费。
- 当 M 阻塞时,可以通过 **Hand Off 交接机制 **会将 M 上 P 的运行队列交给其他 M 执行,交接效率高,进一步提高了 Go 程序整体的并发度;
当然 GMP 模型不止有这些优化,接下来本篇文章将从 G、M、P 对象启动的角度,探究一下 GMP 模型的核心调度过程,有兴趣的同学可以继续跟进后续的源码解读。
2.调度器中重要的数据结构
2.1 g 结构体
为了实现对 goroutine 的调度,需要引入一个数据结构来保存 CPU 寄存器的值,以及 goroutine 的一些状态信息。在调度器源代码中,这个数据结构是一个名叫 g 的结构体,它保存了 goroutine 的所有信息,该结构体的每一个实例对象都代表了一个 goroutine,调度器代码可以通过 g 对象来对 goroutine 进行调度,当 goroutine 被调离 CPU 时,调度器代码负责把 CPU 寄存器的值保存在 g 对象的成员变量之中,当 goroutine 被调度起来运行时,调度器代码又负责把 g 对象的成员变量所保存的寄存器的值恢复到 CPU 的寄存器,完成 goroutine 的切换。接下来看一下 g 结构体(字段太多,只列出关键字段,其他结构体也是如此)。
源码位置:src/runtime/runtime2.go 407
type g struct {
	stack       stack   // goroutine 使用的栈
    // 下面两个成员用于栈溢出检查,实现栈的自动伸缩,抢占调度也会用到 stackguard0
	stackguard0 uintptr
	stackguard1 uintptr

	...

	m         *m      // 当前与 g 绑定的 m
	sched     gobuf   // goroutine 的运行现场, CPU 几个寄存器相关信息

    ...

	param        unsafe.Pointer // wakeup 时传入的参数,可以参考 chan 源码
	atomicstatus atomic.Uint32 // 表示 goroutine所处状态

	goid         uint64

    // schedlink字段指向全局运行队列中的下一个g,
    //所有位于全局运行队列中的g形成一个链表
	schedlink    guintptr

    ...

    // 抢占调度标志。这个为 true 时,stackguard0 等于 stackpreempt
	preempt       bool // preemption signal, duplicates stackguard0 = stackpreempt

	...

	gopc           uintptr         // pc of go statement that created this goroutine
	startpc        uintptr         // pc of goroutine function

	...
}
g 结构体重要字段详细介绍:
- stackguard0 主要用于检查栈空间是否足够的值, 低于这个值会扩张栈;如果 stackguard0 字段被设置成 StackPreempt(值很大) 意味着当前 goroutine 发出了抢占请求,后续会具体讲解使用方式。
- atomicstatus 表示 goroutine 所处状态,状态解释如下:
| g 状态(atomicstatus) | 状态下 g 的情况 |
|---|---|
| _Gidle = 0 | g 刚刚被分配,并且还没有申请内存,还不能被使用 |
| _Grunnable = 1 | g 可运行状态,g 在运行队列中,等待被调度运行 |
| _Grunning = 2 | g 正在执行状态,被分配给了 M,正在执行用户代码,g 不在运行队列中 |
| _Gsyscall = 3 | g 正在执行系统调用,被分配给了 M,M 阻塞在系统调用中,g 不在运行队列中 |
| _Gwaiting = 4 | g 在运行时被程序阻塞(例如 channel 的 go_park),没有执行用户代码,处于睡眠状态,g 不在运行队列中,被在记录在其他等待队列中(比如在 channel 的等待队列中),需要时执行 ready 才能被唤醒 |
| _Gmoribund_unused = 5 | 当前此状态未使用 |
| _Gdead = 6 | 表示 goroutine 实例有内存可以使用。有两种情况会成为 _Gdead,第一种是 g 刚刚申请完内存,表示初始状态,此时 g 可用;第二种是 g 刚刚退出,也就意味着该 g 生命周期结束,可以被放入 freelist,等待重复利用,不用重新申请内存 |
| _Genqueue_unused = 7 | 当前此状态未使用 |
| _Gcopystack = 8 | 需要扩容或者缩小 g 的栈空间,将协程的栈转移到新栈时的状态,没有执行用户代码,不在运行队列上,已经被分配给了 M,目前扩缩栈中,扩缩完成就可以继续执行用户代码 |
| Gpreempted = 9 | g 由于被抢占 M,被重新塞回运行队列中 |
g 结构体关联了两个比较简单的结构体,stack 表示 goroutine 运行时的栈:
// 用于记录 goroutine 使用的栈的起始和结束位置,栈的范围:[lo, hi)
type stack struct{
	// 栈顶,低地址
    lo uintptr
	// 栈低,高地址
    hi uintptr
}
gobuf 用于保存 goroutine 的调度信息,主要包括 CPU 的几个寄存器相关的值,利用 gobuf 可以完成 goroutine 在 CPU 的切换:
type gobuf struct {
    sp   uintptr  // 保存 CPU 的 rsp 寄存器的值(函数栈顶)
    pc   uintptr  // 保存 CPU 的 rip 寄存器的值(下一条运行指令地址)
    g    guintptr // 记录当前这个 gobuf 对象属于哪个 goroutine
    ctxt unsafe.Pointer

    // 保存系统调用的返回值,因为从系统调用返回之后如果 p 被其它工作线程抢占,
    // 则这个 goroutine 会被放入全局运行队列被其它工作线程调度,其它线程需要知道系统调用的返回值。
    ret  sys.Uintreg
    lr   uintptr

    // 保存 CPU 的 rbp 寄存器的值
    bp   uintptr // 对于支持帧指针的系统架构,才有用
}
2.2 m 结构体
Go 调度器源代码中还有一个用来代表工作线程的 m 结构体,每个工作线程都有唯一的一个 m 结构体的实例对象与之对应,m 结构体对象除了记录着工作线程的诸如栈的起止位置、当前正在执行的 goroutine 以及是否空闲等等状态信息之外,还通过指针维持着与 p 结构体的实例对象之间的绑定关系。于是,通过 m 既可以找到与之对应的工作线程正在运行的 goroutine,又可以找到工作线程的局部运行队列等资源 p。
源码位置:src/runtime/runtime2.go 526
type m struct {
	// g0主要用来记录工作线程使用的栈信息,在执行调度代码时需要使用这个栈
	// 执行用户 goroutine 代码时,使用用户 goroutine 自己的栈,因此调度时会发生栈的切换
	g0      *g     // goroutine with scheduling stack

    ...

    // 通过 tls 结构体实现 m 与工作线程的绑定
    // 这里是线程本地存储
	tls           [tlsSlots]uintptr // thread-local storage (for x86 extern register)
	mstartfn      func() // m 初始化后,运行的函数,比如监控线程 runtime.sysmon 或主线程的 runtime.main
    // 指向正在运行的 gorutine 对象
	curg          *g       // current running goroutine

    // 当前工作线程绑定的 p
	p             puintptr // attached p for executing go code (nil if not executing go code)
	nextp         puintptr // 下一个可以绑定的 p
    // 发生系统调用前绑定的 P,为了等系统调用返回时,快速绑定 P
	oldp          puintptr // the p that was attached before executing a syscall

    ...

     // spinning状态:表示当前工作线程正在试图从其它工作线程的本地运行队列偷取 goroutine
	spinning      bool // m is out of work and is actively looking for work
	blocked       bool // m is blocked on a note

    ...

	// 没有goroutine需要运行时,工作线程睡眠在这个park成员上,
    // 其它线程通过这个park唤醒该工作线程
	park          note
    // 记录所有工作线程的一个链表
	alllink       *m // on allm
	schedlink     muintptr

	...

	freelink      *m // on sched.freem

	...
}
前面我们说每个工作线程都有一个 m 结构体对象与之对应,但并未详细说明它们之间是如何对应起来的,工作线程执行的代码是如何找到属于自己的那个 m 结构体实例对象的呢?
答案是:利用线程本地存储 TLS,为每一个工作线程绑定一个 m,这样每个工作线程拥有了各自私有的 m 结构体全局变量,我们就能在不同的工作线程中使用相同的全局变量名来访问不同的 m 结构体对象,这完美的解决我们的问题。而线程的本地存储在 m 结构体中就是 tls 字段,后续文章会详细讲述,线程和 m 实例是如何绑定的。
2.3 p 结构体
上文提到过为了解决全局可运行队列激烈的锁竞争问题,Go 调度器为每一个工作线程引入了局部 goroutine 运行队列,工作线程优先使用自己的局部运行队列,只有必要时才会去访问全局运行队列,这大大减少了锁冲突,提高了工作线程的并发性。在 Go 调度器源代码中,局部运行队列被包含在 p 结构体的实例对象之中,每一个运行着 go 代码的工作线程都会与一个 p 结构体的实例对象关联在一起。p 结构体用于保存工作线程执行 go 代码时所必需的资源,比如 goroutine 的运行队列,内存分配用到的缓存等等。
源码位置:src/runtime/runtime2.go 609
type p struct {
    // 在 allp 中的索引
	id          int32
	status      uint32 	   // P 状态 one of pidle/prunning/...
	link        puintptr   // pidle 链表的指针
	schedtick   uint32     // 每次调用 schedule 时会加一
	syscalltick uint32     // 每次系统调用时加一
	sysmontick  sysmontick // 用于 sysmon 线程记录被监控 p 的系统调用时间和运行时间(抢占的时候用)
	m           muintptr   // 绑定的 m back-link to associated m (nil if idle)

    ...

	// 本地可运行的队列,不用通过锁即可访问
	runqhead uint32  // 队列头
	runqtail uint32  // 队列尾
	runq     [256]guintptr // 使用数组实现的循环队列,大小 256

    // runnext 非空时,代表的是一个 runnable 状态的 G,
	// 这个 G 被当前 G 修改为 ready 状态,相比 runq 中的 G 有更高的优先级。
	// 如果当前 G 还有剩余的可用时间,那么就应该运行这个 G
	// 运行之后,该 G 会继承当前 G 的剩余时间
	runnext guintptr

	// Available G's (status == Gdead)
	gFree struct {
		gList
		n int32
	}

	...
}

type sysmontick struct {
	schedtick   uint32
	schedwhen   int64
	syscalltick uint32
	syscallwhen int64
}

// A gList is a list of Gs linked through g.schedlink. A G can only be
// on one gQueue or gList at a time.
type gList struct {
	head guintptr
}
这里介绍一下 p 中最为重要的几个字段:
- p 结构体中,runq 再配合 runqhead 和 runqtail 模拟了一个循环队列,大小为 256,用于存储本地可运行的 G。
- runnext 不为 nil 的话,该 P 绑定的 M 的下一个调度的 g 优先是 runnext 指向的 g。
- gFree 是一个 goroutine 缓存池,里面的 g 的状态都是 Gdead,goroutine 内存可以被重复利用,gList 是一个链表,n 是数量。创建 goroutine 时, 会先从 gFreee list 中查找空闲的 goroutine,如果不存在空闲的 goroutine,会重新创建 goroutine。
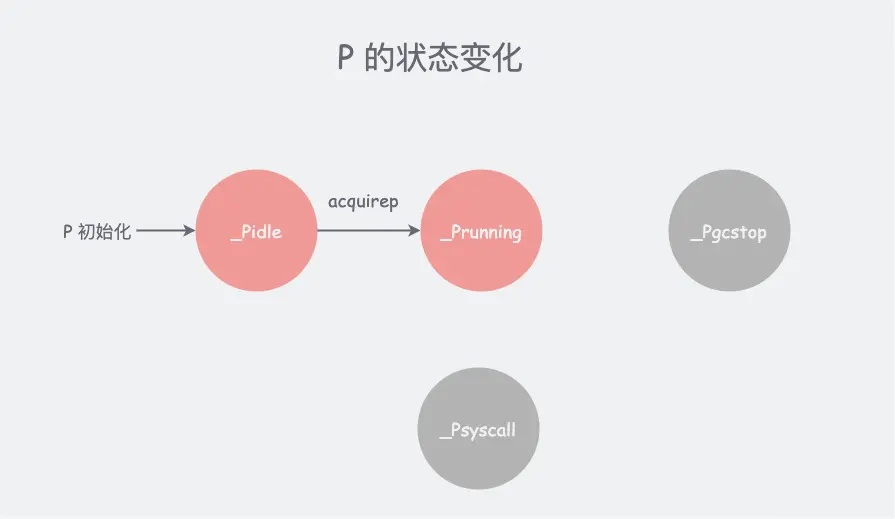
- status 表示 p 的状态,包括以下几种:
| p 的状态 | 状态解释 |
|---|---|
| _Pidle = 0 | 当前 P 没有被使用,通常是在 schedt.pidle 中等着被调度,同时它的本地运行列队为空 |
| _Prunning = 1 | 当前 P 被线程 M 持有,在此状态下,只有拥有当前 P 的 M 才可能修改状态 |
| _Psyscall = 2 | 当前 P 与一个正在进行系统调用的 M 关联着,M 进入系统调用阻塞前改变 P 为此状态,但此时 P 并不属于这个 M,M 和 P 已经解绑, P 可能会被其他 M 偷走,或者该 M 结束系统调用,重新绑定 P |
| _Pgcstop = 3 | 当前 P 所属 M 正在进行 GC |
| _Pdead = 4 | 当前 P 已经不被使用 (如动态调小 GOMAXPROCS) |
2.4 schedt 结构体
为了实现对 goroutine 的调度,需要一个存放可运行 G 的容器,便于 M 寻找,因此引入了 schedt 结构体:
- 用来保存调度器自身的状态信息;
- 拥有一个用来保存 goroutine 的运行队列,由于每个 Go 程序只有一个调度器,只有一个 schedt 实例对象被 M 共享,因此该运行队列被称为:全局运行队列。
源码位置:src/runtime/runtime2.go 766
type schedt struct {
	...

	lastpoll  atomic.Int64 // 上次网络轮询的时间,如果当前轮询则为 0
	pollUntil atomic.Int64 // 当前轮询休眠的时间

	lock mutex

	midle        muintptr // 由空闲的 m 组成的链表
	nmidle       int32    // 空闲的 m 数量
	nmidlelocked int32    // 空闲的且被 lock 的 m 计数
	mnext        int64    // 已创建的 m 的数量和下一个 M ID
	maxmcount    int32    // 表示最多所能创建的 m 数量
	nmsys        int32    // 不计入死锁的系统 m 数量
	nmfreed      int64    // 释放的 m 的累积数量

	ngsys atomic.Int32 // 系统 goroutine 数量

	pidle        puintptr // 由空闲的 p 结构体对象组成的链表,pidle 表示头指针
	npidle       atomic.Int32 // 空闲的 p 结构体对象的数量
    // 关于自旋 m 的数量,唤醒 P 的关键条件
	nmspinning   atomic.Int32  // See "Worker thread parking/unparking" comment in proc.go.
	needspinning atomic.Uint32 // See "Delicate dance" comment in proc.go. Boolean. Must hold sched.lock to set to 1.


	runq     gQueue // 全局可运行的 G 队列
	runqsize int32 // 全局可运行的 G 队列元素数量

    ...

	// Global cache of dead G's.
    // gFree 是所有已经退出的 goroutine 对应的 g 结构体对象组成的链表
    // 用于缓存 g 结构体对象,避免每次创建 goroutine 时都重新分配内存
	gFree struct {
		lock    mutex
		stack   gList // Gs with stacks
		noStack gList // Gs without stacks
		n       int32
	}

	...
}

// gQueue 是通过 g.schedlink 链接的 G 的出队。
// 一个 G 一次只能位于一个 gQueue 或 gList 上。
type gQueue struct {
	head guintptr
	tail guintptr
}
2.5 全局变量
在程序初始化时,这些全变量都会被初始化为 0 值,指针会被初始化为 nil 指针,切片初始化为 nil 切片,int 被初始化为数字 0,结构体的所有成员变量按其本类型初始化为其类型的 0 值。所以程序刚启动时 allgs,allm 和 allp 都不包含任何 g、m 和 p。
allglen     uintptr  // 所有 g 的长度
allgs       []*g     // 保存所有的 g
allm        *m       // 所有的 m 构成的一个链表,包括下面的 m0
allp        []*p     // 保存所有的 p,len(allp) == gomaxprocs

ncpu       int32   // 系统中 cpu 核的数量,程序启动时由 runtime 代码初始化
gomaxprocs int32   // p 的最大值,默认等于 ncpu,但可以通过 GOMAXPROCS 修改

sched      schedt  // 调度器结构体对象,记录了调度器的工作状态

m0  m        // m0 代表进程的主线程
g0  g        // m0的g0,也就是m0.g0 = &g0
这里有个特殊的变量 g0,g0 的主要作用是提供一个栈供 runtime 代码执行; g0 是每次启动一个 M 都会第一个创建的 gourtine,g0 仅用于负责调度 g,g0 不指向任何可执行的函数, 每个 M 都会有一个自己的 g0。在调度或系统调用时会使用 g0 的栈空间, 全局变量的 g0 是 m0 的 g0,该 g0 的栈大约有64K,在系统的栈上进行分配,内存分配情况我们下一篇文章详细分析。
3.G、M、P 的启动
本小节主要讲述普通 G、M、P 启动的时刻和准备工作,为后续理解调度做准备(注:main 函数的启动过程,因为比较特殊,也比较重要,需要详细介绍,所以有关主线程 M0 和第一个 G 的启动内容在下一篇文章详细讲解)
3.1 G 的创建
先聊一下普通的 g 是怎么创建的?其实我们都很熟悉 go 这个关键字,该关键字就是创建 g 的关键!首先使用 go build -gcflags="-S -l -N" main.go 2> main.s 工具链将下面的代码生成汇编。
package main

import (
	"fmt"
	"time"
)

func main() {
	go func() {
		fmt.Println("Hello GMP!")
	}()

	time.Sleep(time.Second)
}
我们会看到 go 关键字被编译成了 CALL runtime.newproc(SB)汇编语句,当我们使用 go 关键字时,编译器会翻译成汇编代码调用 runtime·newproc 创建一个协程,该函数源代码在 src/runtime/proc.go。
// Create a new g running fn.
// Put it on the queue of g's waiting to run.
// The compiler turns a go statement into a call to this.
func newproc(fn *funcval) {
	gp := getg()
	pc := getcallerpc() // 获取 newproc 函数调用者指令的地址
	systemstack(func() {
		newg := newproc1(fn, gp, pc)

		pp := getg().m.p.ptr()
		runqput(pp, newg, true)

		if mainStarted {
			wakep()
		}
	})
}
newproc 函数用于创建新的 goroutine,它有一个参数 fn 表示 g 创建出来要执行的函数,接下来我们分析一下 newproc 函数的内容。本章节只分析普通 goroutine 的创建,创建步骤如下:
- 使用 systemstack 函数切换到系统栈(一般是 g0 栈)中执行,执行完毕后切回普通 g 的栈;
- newproc1 用于创建一个新可运行的 goroutine,主要是内存分配和 g 参数的初始化;
- 获取当前 g 的 p,优先将 newg 放入该 p 的本地队列,本地队列放不下,放入全局运行队列中;
- 如果 main 函数已经启动,则使用 wakep 函数唤醒一个 p(wakep 函数我们后续讲解,这里我们先分析前三个步骤)。
第一步:
systemstack 括起来的地方表示切换到 g0 栈去执行,执行完切换回来,systemstack 函数是使用汇编实现的(有兴趣的可以看看),源码 src/runtime/asm_amd64.s 466;
// func systemstack(fn func())
TEXT runtime·systemstack(SB), NOSPLIT, $0-8
	MOVQ	fn+0(FP), DI	// DI = fn
	get_tls(CX) // 从 tls 获取 g 到 cx 中
	MOVQ	g(CX), AX	// AX = g
	MOVQ	g_m(AX), BX	// BX = m

	CMPQ	AX, m_gsignal(BX) // g 是否是信号 g
	JEQ	noswitch // 是的话不用切换栈,直接执行 DI 就行

	MOVQ	m_g0(BX), DX	// DX = g0
	CMPQ	AX, DX // g 是否是 g0 (是否已经在使用 g0 栈了)
	JEQ	noswitch // 是的话不用切换栈,直接执行 DI 就行

	CMPQ	AX, m_curg(BX) // g 是否是当前 m 正在运行的 g
	JNE	bad // g 不是 m 当前运行的 g,代码出现问题

	// switch stacks 切换栈
	// save our state in g->sched. Pretend to
	// be systemstack_switch if the G stack is scanned.
	CALL	gosave_systemstack_switch<>(SB)

	// switch to g0
	MOVQ	DX, g(CX)
	MOVQ	DX, R14 // set the g register
	MOVQ	(g_sched+gobuf_sp)(DX), BX // g0 的 sp
	MOVQ	BX, SP // 切换到 g0 栈

	// call target function
	MOVQ	DI, DX
	MOVQ	0(DI), DI
	CALL	DI

	// switch back to g
	get_tls(CX) // g0
	MOVQ	g(CX), AX // AX = g0
	MOVQ	g_m(AX), BX // BX = m
	MOVQ	m_curg(BX), AX // AX = g
	MOVQ	AX, g(CX) // tls 存入 g
	MOVQ	(g_sched+gobuf_sp)(AX), SP // 切换 g 的 sp
	MOVQ	$0, (g_sched+gobuf_sp)(AX) // 清除不用的数据
	RET

noswitch:
	// already on m stack; tail call the function
	// Using a tail call here cleans up tracebacks since we won't stop
	// at an intermediate systemstack.
	MOVQ	DI, DX
	MOVQ	0(DI), DI
	JMP	DI

bad:
	// Bad: g is not gsignal, not g0, not curg. What is it?
	MOVQ	$runtime·badsystemstack(SB), AX
	CALL	AX
	INT	$3
第二步:
newproc 函数中调用 newproc1 创建一个可运行的 newg。
// Create a new g in state _Grunnable, starting at fn. callerpc is the
// address of the go statement that created this. The caller is responsible
// for adding the new g to the scheduler.
func newproc1(fn *funcval, callergp *g, callerpc uintptr) *g {
	if fn == nil {
		fatal("go of nil func value")
	}

	mp := acquirem() // 禁止抢占 m
	pp := mp.p.ptr()
	newg := gfget(pp) // 从 p 的 gFree 获取一个可用的 g
	if newg == nil {
		newg = malg(_StackMin) // 只能创建一个 g 了; _StackMin = 2k
		casgstatus(newg, _Gidle, _Gdead) // 改变 g 状态为 _Gdead
		allgadd(newg) // publishes with a g->status of Gdead so GC scanner doesn't look at uninitialized stack.
	}

    ...

    // 额外准备一些栈空间
	totalSize := uintptr(4*goarch.PtrSize + sys.MinFrameSize) // extra space in case of reads slightly beyond frame
	totalSize = alignUp(totalSize, sys.StackAlign)
	sp := newg.stack.hi - totalSize


    // 初始化 g 参数
    // 清除内存数据,因为 g 可能是复用已经 dead 的 g
    // 把 newg.sched 结构体成员的所有成员设置为 0
	memclrNoHeapPointers(unsafe.Pointer(&newg.sched), unsafe.Sizeof(newg.sched))
	// 设置 newg 的 sched 成员,调度器需要依靠这些字段才能把 goroutine 调度到 CPU 上运行。
    newg.sched.sp = sp // newg 的栈顶
	newg.stktopsp = sp
    // newg.sched.pc 表示当 newg 被调度起来运行时从这个地址开始执行指令
    // 把 pc 设置成了 goexit 这个函数偏移1(sys.PCQuantum = 1)的位置,
    // 至于为什么要这么做需要等到分析完 gostartcallfn 函数才知道
	newg.sched.pc = abi.FuncPCABI0(goexit) + sys.PCQuantum // +PCQuantum so that previous instruction is in same function
	newg.sched.g = guintptr(unsafe.Pointer(newg))

    // 调整 sched 成员和 newg 的栈,一会具体分析一下这个关键函数!!!
	gostartcallfn(&newg.sched, fn)
	newg.gopc = callerpc
	newg.ancestors = saveAncestors(callergp) // 记录一下创建 g 的祖先 g,debug 用的
	newg.startpc = fn.fn // 指向 fn 真正开始执行的第一条指令,和函数的底层实现有关

    ...

	casgstatus(newg, _Gdead, _Grunnable) // g 设置为可运行状态


    // 生成 g_id
	if pp.goidcache == pp.goidcacheend {
		// Sched.goidgen is the last allocated id,
		// this batch must be [sched.goidgen+1, sched.goidgen+GoidCacheBatch].
		// At startup sched.goidgen=0, so main goroutine receives goid=1.
		pp.goidcache = sched.goidgen.Add(_GoidCacheBatch)
		pp.goidcache -= _GoidCacheBatch - 1
		pp.goidcacheend = pp.goidcache + _GoidCacheBatch
	}
	newg.goid = pp.goidcache // 初始化 gid
	pp.goidcache++ // 下一个 gid

    ...

	releasem(mp) // 释放 m,允许抢占

	return newg
}
这段代码首先对 newg 的 sched 成员进行了初始化,该成员包含了调度器代码在调度 goroutine 到 CPU 运行时所必须的一些信息:
- sched 的 sp 成员表示 newg 被调度起来运行时应该使用的栈的栈顶;
- sched 的 pc 成员表示当 newg 被调度起来运行时从这个地址开始执行指令。
然而从上面的代码可以看到,newg.sched.pc 被设置成了 goexit 函数的第二条指令的地址而不是 fn.fn,这是为什么呢?要回答这个问题,必须深入到 gostartcallfn 函数中做进一步分析。
// adjust Gobuf as if it executed a call to fn
// and then stopped before the first instruction in fn.
func gostartcallfn(gobuf *gobuf, fv *funcval) {
	var fn unsafe.Pointer
	if fv != nil {
		fn = unsafe.Pointer(fv.fn)
	} else {
		fn = unsafe.Pointer(abi.FuncPCABIInternal(nilfunc))
	}
	gostartcall(gobuf, fn, unsafe.Pointer(fv))
}

// adjust Gobuf as if it executed a call to fn with context ctxt
// and then stopped before the first instruction in fn.
func gostartcall(buf *gobuf, fn, ctxt unsafe.Pointer) {
	sp := buf.sp // newg 的栈顶
	sp -= goarch.PtrSize // 栈顶向下移动 8 字节,用来存 return address
	*(*uintptr)(unsafe.Pointer(sp)) = buf.pc // return address =  goexit 函数的第二条指令的地址
	buf.sp = sp // 设置 buf.sp 指向新的栈顶
	buf.pc = uintptr(fn) // buf.pc 执行函数地址 fn,后边 g 被调度起来,会从这里开始执行
	buf.ctxt = ctxt
}
gostartcallfn 函数首先从参数 fv 中提取出函数地址 fv.fn,然后继续调用 gostartcall 函数。
gostartcall 函数的主要作用有两个:
- 调整 newg 的栈空间,把 goexit 函数的第二条指令的地址入栈,伪造成 goexit 函数调用了 fn 的假象,从而使 fn 执行完成后,执行 ret 指令时,返回到 goexit+1 处继续执行,完成最后的清理工作;
- 重新设置 newg.buf.sp 指向新栈顶,设置 newg.buf.pc 为需要执行的函数的地址,即 fn,也就是 go 关键字后边的函数的地址。至此,一个可用的 goroutine 就创建好了!
这里把 goexit 函数也贴出来,你就知道 goexit+1 指向哪里了,也就知道 g 正常执行结束后,会 ret 到哪里了;从源码里我们可以看到 goexit+1 地址指向 CALL runtime·goexit1(SB) 指令,其实 g 正常 ret 后,继续调用了 runtime·goexit1 函数:
源码地址:src/runtime/asm_amd64.s : 1595
// The top-most function running on a goroutine
// returns to goexit+PCQuantum.
TEXT runtime·goexit(SB),NOSPLIT|TOPFRAME,$0-0
	BYTE	$0x90	// NOP
	CALL	runtime·goexit1(SB)	// does not return
	// traceback from goexit1 must hit code range of goexit
	BYTE	$0x90	// NOP
我们继续把目光回到主线任务:
第三步:
调用 runqput 函数将 g 放入可运行队列,优先放入 p 的本地队列,本地队列满了,再放入全局可运行队列;如果 next = true,将 g 替换当前的 pp.runnext,然后将 pp.runnext 中原本的内容重新放入可运行队列。
// runqput tries to put g on the local runnable queue.
// If next is false, runqput adds g to the tail of the runnable queue.
// If next is true, runqput puts g in the pp.runnext slot.
// If the run queue is full, runnext puts g on the global queue.
// Executed only by the owner P.
func runqput(pp *p, gp *g, next bool) {
    // 引入调度的随机性
	if randomizeScheduler && next && fastrandn(2) == 0 {
		next = false
	}

	if next {
	retryNext:
        // 为了最大限度的保持局部优先性,gp 优先放入 pp.runnext 槽中
		oldnext := pp.runnext
		if !pp.runnext.cas(oldnext, guintptr(unsafe.Pointer(gp))) {
            // cas 保证操作的原子性
			goto retryNext
		}
        // 原本 runnext 值为 nil,所以没任何事情可做了,直接返回
		if oldnext == 0 {
			return
		}
		// Kick the old runnext out to the regular run queue.
        // //原本存放在 runnext 的 gp 需要放入 runq 的尾部
		gp = oldnext.ptr()
	}

retry:
    // 可能有其它线程正在并发修改 runqhead 成员,所以需要跟其它线程同步
	h := atomic.LoadAcq(&pp.runqhead) // load-acquire, synchronize with consumers
	t := pp.runqtail
    // 判断 p 的本地运行队列是否满了
	if t-h < uint32(len(pp.runq)) {
        // 队列还没有满,可以放入,尾部放入 gp
		pp.runq[t%uint32(len(pp.runq))].set(gp)

        // 虽然没有其它线程并发修改这个 runqtail,但其它线程会并发读取该值以及 p 的 runq 成员
        // 这里使用 StoreRel (汇编实现的)是为了:
        // 1.原子写入 runqtail
        // 2.防止编译器和 CPU 乱序,保证上一行代码对 runq 的修改发生在修改 runqtail 之前
        // 3.可见行屏障,保证当前线程对运行队列的修改对其它线程立马可见
		atomic.StoreRel(&pp.runqtail, t+1) // store-release, makes the item available for consumption
		return
	}
    // p 的本地运行队列已满,需要放入全局运行队列
	if runqputslow(pp, gp, h, t) {
		return
	}

	// the queue is not full, now the put above must succeed
	goto retry // 队列未满时,必须得执行成功
}
我们再来简单的过一下 runqputslow 函数:
// Put g and a batch of work from local runnable queue on global queue.
// Executed only by the owner P.
func runqputslow(pp *p, gp *g, h, t uint32) bool {
	var batch [len(pp.runq)/2 + 1]*g // gp 加上 p 本地队列的一半

	// First, grab a batch from local queue.
	n := t - h
	n = n / 2
	if n != uint32(len(pp.runq)/2) {
		throw("runqputslow: queue is not full")
	}
    // 取出 p 本地队列的一半
	for i := uint32(0); i < n; i++ {
		batch[i] = pp.runq[(h+i)%uint32(len(pp.runq))].ptr()
	}
	if !atomic.CasRel(&pp.runqhead, h, h+n) { // cas-release, commits consume
		// 这里存在并发,会有其他 p 过来偷 g
        // 如果 cas 操作失败,说明已经有其它工作线程
        // 从 p 的本地运行队列偷走了一些 goroutine
        // 所以直接返回,让 p 继续 retry 就行
        return false
	}

	batch[n] = gp

    // 增加调度的随机性,随机打乱一下顺序
	if randomizeScheduler {
		for i := uint32(1); i <= n; i++ {
			j := fastrandn(i + 1)
			batch[i], batch[j] = batch[j], batch[i]
		}
	}

	// Link the goroutines.
    // 全局运行队列是一个链表,这里首先把所有需要放入全局运行队列的 g 链接起来,
    // 减少后面对全局链表的锁住时间,从而降低锁冲突
	for i := uint32(0); i < n; i++ {
		batch[i].schedlink.set(batch[i+1])
	}
	var q gQueue
	q.head.set(batch[0])
	q.tail.set(batch[n])

	// Now put the batch on global queue.
	lock(&sched.lock)
	globrunqputbatch(&q, int32(n+1))
	unlock(&sched.lock)
	return true
}
runqputslow 函数首先把从 p 的本地队列中取出的一半,连同 gp 一起通过链表串联起来;然后在加锁成功之后,通过 globrunqputbatch 函数把该链表链入全局运行队列(全局运行队列是使用链表实现的)。值的一提的是 runqputslow 函数并没有一开始就把全局运行队列锁住,而是等所有的准备工作做完之后才锁住全局运行队列,这是并发编程加锁的基本原则,需要尽量减小锁的粒度,降低锁冲突的概率。
到这里,一个新的可运行的 goroutine 就被塞入可运行队列中了,接下来我们聊一下 goroutine 如何被运行起来!
3.2 P 的唤醒
P 在整个程序启动的时候就被初始化了,具体是在 schedinit 函数中初始化的,但这里我并不想展开,我会把这一块放入 main 函数的启动一节,这样会更加清晰!
那 P 什么时候会被唤醒呢?
通过创建 G 源码第四步骤,就已经发现是 wakep 函数负责唤醒 P,该方法的上游还是有不少的,来源的代码我就不一一分析了,情况有如下几个:
- 唤醒阻塞 G (ready )的时候,会尝试唤醒 P,比如 channel 阻塞和唤醒;
- STW 之后,唤醒 P;
- 唤醒一个空闲的 P 来为定时器和网络轮询器提供服务(如果还没有的话);
- 在 schedule 函数循环调度过程中,当自旋 M 找到 G,而结束自旋时,尝试唤醒一个 P;
- 在 schedule 过程中,如果正在调度一个非正常的 G (比如 GC)时,尝试唤醒一个 P;
- 新 G 创建的时候,会尝试唤醒 P(也就是我们刚刚分析的那个)。

好了,分析了一下 P 被唤醒的来源,我们来解读一下 wakep 函数的源码吧!
// Tries to add one more P to execute G's.
// Called when a G is made runnable (newproc, ready).
// Must be called with a P.
func wakep() {
	// Be conservative about spinning threads, only start one if none exist
	// already.
    // 不是很随意就能唤醒一个 P,需要满足一定的条件
    // 当没有自旋 m 的时候才能唤醒 P
	if sched.nmspinning.Load() != 0 || !sched.nmspinning.CompareAndSwap(0, 1) {
		return
	}

	// Disable preemption until ownership of pp transfers to the next M in
	// startm. Otherwise preemption here would leave pp stuck waiting to
	// enter _Pgcstop.
	//
	// See preemption comment on acquirem in startm for more details.
	mp := acquirem() // 禁止抢占

	var pp *p
    // sched 全局对象加锁,因为要从 sched.pidle 空闲 P 链表中获取 P
	lock(&sched.lock)
    // 从 sched.pidle 获取空闲的 p(函数比较简单,就是链表的使用,这里不分析了)
	pp, _ = pidlegetSpinning(0)
	if pp == nil {
		if sched.nmspinning.Add(-1) < 0 {
			throw("wakep: negative nmspinning")
		}
		unlock(&sched.lock)
		releasem(mp)
		return
	}
	// Since we always have a P, the race in the "No M is available"
	// comment in startm doesn't apply during the small window between the
	// unlock here and lock in startm. A checkdead in between will always
	// see at least one running M (ours).
	unlock(&sched.lock)

    // 开始一个 M
	startm(pp, true, false)

	releasem(mp)
}
wakep 函数逻辑比较简单:
- 首先判断处于自旋状态的 M 数量是否等于 0,然后通过 cas 操作再次确认是否有其它 M 正处于 spinning 状态,判断到需要启动 M 之后,到真正启动 M 之前的这一段时间之内,如果已经有 M 进入了 spinning 状态,而在四处寻找需要运行的 goroutine,这样的话我们就没有必要再启动一个多余的工作线程出来了。
- 通过这一层校验后,说明没有处于 spinning 状态的 M,我们可以启动一个 M,所以从 sched.pidle 全局空闲 P 链表中,获取一个空闲状态的 P,如果获取成功则启动一个 M。
该场景下启动 M 使用的是 startm 函数,我们继续沿着这个方向,继续分析一下 M 是如何被启动起来的!
3.3 M 的启动
m 启动使用 startm 函数,我们一起来看一下源码:
func startm(pp *p, spinning, lockheld bool) {

	mp := acquirem()
	if !lockheld {
		lock(&sched.lock)
	}
    // 如果 p 不存在,从空闲链表获取
	if pp == nil {
		if spinning {
			// TODO(prattmic): All remaining calls to this function
			// with _p_ == nil could be cleaned up to find a P
			// before calling startm.
			throw("startm: P required for spinning=true")
		}
		pp, _ = pidleget(0)
		if pp == nil {
			if !lockheld {
				unlock(&sched.lock)
			}
			releasem(mp)
			return
		}
	}
	nmp := mget() // 尝试从空闲的 M 链表获取一个 M
	if nmp == nil {
		// 利用 sched.mnext 创建新 M 的 ID
		id := mReserveID() // 这里有加锁
		unlock(&sched.lock)// 这里解锁

        // 设置新 M 的执行函数 fn,直接设置自己为 spinning
		var fn func()
		if spinning {
			// The caller incremented nmspinning, so set m.spinning in the new M.
			fn = mspinning
		}
		newm(fn, pp, id) // 新建一个 M,这个函数非常重要!!!一会详细分析

		if lockheld {
			lock(&sched.lock)
		}
		// Ownership transfer of pp committed by start in newm.
		// Preemption is now safe.
		releasem(mp)
		return
	}

    ...

    // The caller incremented nmspinning, so set m.spinning in the new M.
	nmp.spinning = spinning
	nmp.nextp.set(pp) // 为后续绑定 P 做准备,m 后续只需绑定 nextp
	notewakeup(&nmp.park) // 唤醒处于休眠状态的工作线程
	// Ownership transfer of pp committed by wakeup. Preemption is now
	// safe.
	releasem(mp)
}
startm 函数首先判断是否有空闲的 p 结构体对象,如果没有则直接返回,如果有则需要创建或唤醒一个工作线程出来与之绑定。在确保有可以绑定的 p 对象之后,startm 函数分两条路走:
- 首先尝试从 m 的空闲队列中查找正处于休眠状态的工作线程,如果找到则通过 notewakeup 函数唤醒它,开始调度。
- 否则调用 newm 函数创建一个新的工作线程出来,开始新的调度。
3.3.1 唤醒休眠的 M
聊 notewakeup(&nmp.park) 源码之前,先了解一个背景知识,什么是 nmp.park,在 schedule 调度过程中,当 M 找不到可运行的 G 时,工作线程会通过 notesleep(&gp.m.park) 函数睡眠在 m.park 成员上,所以这里使用 m.park 成员作为参数,调用 notewakeup 把睡眠在该成员之上的工作线程唤醒。
这里找源码需要注意一下,想看 linux 源码的,就得跳转到 src/runtime/lock_futex.go 139 了,跳转会根据你现在的系统跳转,比如我现在用的 mac,idea 就给我跳到这里了:runtime/lock_sema.go 142,这里分析的是 linux 下的代码。
func notewakeup(n *note) {
	old := atomic.Xchg(key32(&n.key), 1)
	if old != 0 {
		print("notewakeup - double wakeup (", old, ")\n")
		throw("notewakeup - double wakeup")
	}
	futexwakeup(key32(&n.key), 1)
}
notewakeup 函数首先使用 atomic.Xchg 设置 note.key = 1,这是为了使被唤醒的线程,可以通过查看该值是否等于1,来确定是被其它线程唤醒,还是意外从睡眠中苏醒了过来,如果该值为 1 则表示是被唤醒的,可以继续工作了,但如果该值为 0,则表示是意外苏醒,需要抛出异常。
notewakeup 函数拿到 M 唤醒的权限后,开始执行唤醒 M 的函数 futexwakeup。
源码:runtime/os_linux.go : 81
//go:nosplit
func futexwakeup(addr *uint32, cnt uint32) {
    // 调用 futex 函数唤醒工作线程
	ret := futex(unsafe.Pointer(addr), _FUTEX_WAKE_PRIVATE, cnt, nil, nil, 0)
	if ret >= 0 {
		return
	}

	// I don't know that futex wakeup can return
	// EAGAIN or EINTR, but if it does, it would be
	// safe to loop and call futex again.
	systemstack(func() {
		print("futexwakeup addr=", addr, " returned ", ret, "\n")
	})

	*(*int32)(unsafe.Pointer(uintptr(0x1006))) = 0x1006
}
对于 Linux 平台来说,工作线程通过 note 睡眠,其实是通过 futex 系统调用睡眠在内核之中,所以唤醒处于睡眠状态的线程,也需要通过 futex 系统调用进入内核来唤醒,所以这里的 futexwakeup 又继续调用futex 函数(该函数包装了 futex 系统调用)来实现唤醒睡眠在内核中的工作线程。
源码地址 runtime/sys_linux_amd64.s
// int64 futex(int32 *uaddr, int32 op, int32 val,
//	struct timespec *timeout, int32 *uaddr2, int32 val2);
TEXT runtime·futex(SB),NOSPLIT,$0
    MOVQ	addr+0(FP), DI // SYS_futex 参数准备
    MOVL	op+8(FP), SI
    MOVL	val+12(FP), DX
    MOVQ	ts+16(FP), R10
    MOVQ	addr2+24(FP), R8
    MOVL	val3+32(FP), R9
    MOVL	$SYS_futex, AX // futex 系统调用编号放入 AX 寄存器
    SYSCALL // 系统调用,进入内核
    MOVL	AX, ret+40(FP) // 系统调用通过 AX 寄存器返回返回值
    RET
futex 函数由汇编代码写成,前面的几条指令都在为 futex 系统调用(define SYS_futex 202)准备参数,参数准备完成之后则通过 SYSCALL 指令进入操作系统内核,完成线程的唤醒功能。内核在完成唤醒工作之后,当前工作线程 M 则从内核返回到 futex 函数,继续执行 SYSCALL 指令之后的代码,并按函数调用链原路返回,继续执行其它代码;而被唤醒的工作线程 M',则由内核负责在适当的时候调度到 CPU 上运行。
看到这里不知道你们有没有这样一个疑问:为什么 M' 还没绑定 P,就能直接被调度到 CPU 运行了?其实是不实庐山真面,原因是我们还没有聊到 M' 被唤醒以后从哪里执行呢!
当 M' 被 CPU 调度执行时,M' 会从开始睡眠的地方继续执行。我们前边聊过一个背景知识:在 schedule 调度过程中,当 M' 找不到可运行的 G 时,工作线程会通过 notesleep(&gp.m.park) 函数睡眠在 m.park 成员上,当 M' 被唤醒时,当然要从睡眠这里继续执行啦!看代码 src/runtime/proc.go 3349:
// 调度
func schedule() {
    ...
    gp, inheritTime, tryWakeP := findRunnable() // blocks until work is available
	...

    execute(gp, inheritTime)
}

// 寻找可运行的 g
func findRunnable() (gp *g, inheritTime, tryWakeP bool) {
    mp := getg().m

top:
	pp := mp.p.ptr()

    // 省略调度策略:寻找 g 的过程
    ...

    stopm()
	goto top
}

// Stops execution of the current m until new work is available.
// Returns with acquired P.
func stopm() {
	gp := getg()

	if gp.m.locks != 0 {
		throw("stopm holding locks")
	}
	if gp.m.p != 0 {
		throw("stopm holding p")
	}
	if gp.m.spinning {
		throw("stopm spinning")
	}

	lock(&sched.lock)
	mput(gp.m) // 把 m 结构体对象放入 sched.midle 空闲队列
	unlock(&sched.lock)
	mPark() // 睡眠和被唤醒
	acquirep(gp.m.nextp.ptr()) // 绑定 m 和 p
	gp.m.nextp = 0 // 重置 nextp
}

// mPark causes a thread to park itself, returning once woken.
//
//go:nosplit
func mPark() {
	gp := getg()
	notesleep(&gp.m.park) // 进入睡眠状态
	noteclear(&gp.m.park) // 被其它工作线程唤醒
}
当 M' 被唤醒&被 CPU 调度执行时,代码从 mPark 函数中 noteclear(&gp.m.park) 开始执行:
- 首先清除 park 信息,结束睡眠;
- 把 M' 和唤醒之前获取的 P(在 nextp 存着) 绑定,设置 p 的状态从 _Pidle 变为 _Prunning ,重置 nextp;
- 通过 goto top 跳转,继续寻找可执行的 G,开始下一次调度循环 schedule。
3.3.2 创建新 M
我们把思路拉回到 startm 函数,如果没有正处于休眠状态的工作线程,则需要调用 newm 函数新建一个工作线程。源码:runtime/proc.go
//go:nowritebarrierrec
func newm(fn func(), pp *p, id int64) {
    acquirem()

    mp := allocm(pp, fn, id) // 创建 m,并分配内存,初始化 g0 与 m 绑定
    mp.nextp.set(pp) // nextp 设置要绑定 p,后边直接用就行

    ...

    newm1(mp)
    releasem(getg().m)
}

func newm1(mp *m) {
    // 省略 cgo 相关代码.......
    execLock.rlock() // Prevent process clone.
    newosproc(mp)
    execLock.runlock()
}
newm 首先调用 allocm 函数从堆上分配一个 m 结构体对象,设置 mp.mstartfn = fn,此时 fn = mspinning,创建 g0 对象,并为 g0 申请 8KB 栈内存,绑定 m 和 g0,m.nextp 设置要绑定 p,以便后续可以直接绑定 p;然后调用 newm1 函数。
newm1 继续调用 newosproc 函数,newosproc 的主要任务是调用 clone 函数创建一个系统线程,而新建的这个系统线程将从 mstart 函数(clone 函数的第五个参数,会在汇编中被调用)开始运行。源码:runtime/os_linux.go 163
// May run with m.p==nil, so write barriers are not allowed.
//
//go:nowritebarrier
func newosproc(mp *m) {
	stk := unsafe.Pointer(mp.g0.stack.hi)
    ...

	ret := retryOnEAGAIN(func() int32 {
		r := clone(cloneFlags, stk, unsafe.Pointer(mp), unsafe.Pointer(mp.g0), unsafe.Pointer(abi.FuncPCABI0(mstart)))
		// clone returns positive TID, negative errno.
		// We don't care about the TID.
		if r >= 0 {
			return 0
		}
		return -r
	})

	...
}

// clone系统调用的 Flags 选项
cloneFlags = _CLONE_VM | /* share memory */ //指定父子线程共享进程地址空间
_CLONE_FS | /* share cwd, etc */
_CLONE_FILES | /* share fd table */
_CLONE_SIGHAND | /* share sig handler table */
_CLONE_SYSVSEM | /* share SysV semaphore undo lists (see issue #20763) */
_CLONE_THREAD /* revisit - okay for now */  //创建子线程而不是子进程
clone 函数是由汇编语言实现的,该函数使用 clone 系统调用完成创建系统线程的核心功能。这个地方很重要,我们详细分析一下,源码:runtime/sys_linux_amd64.s 558
// int32 clone(int32 flags, void *stk, M *mp, G *gp, void (*fn)(void));
TEXT runtime·clone(SB),NOSPLIT,$0
	MOVL	flags+0(FP), DI  // 参数一:cloneFlags
	MOVQ	stk+8(FP), SI    // 参数二:stk
	MOVQ	$0, DX
	MOVQ	$0, R10
	MOVQ    $0, R8
	// Copy mp, gp, fn off parent stack for use by child.
	// Careful: Linux system call clobbers CX and R11.
	MOVQ	mp+16(FP), R13 // 参数三:m
	MOVQ	gp+24(FP), R9  // 参数四:g0
	MOVQ	fn+32(FP), R12 // 参数五:mstart 函数
	CMPQ	R13, $0    // m,该场景下 m != 0
	JEQ	nog1
	CMPQ	R9, $0    // g,该场景下 g != 0
	JEQ	nog1
	LEAQ	m_tls(R13), R8
#ifdef GOOS_android
	// Android stores the TLS offset in runtime·tls_g.
	SUBQ	runtime·tls_g(SB), R8
#else
	ADDQ	$8, R8	// ELF wants to use -8(FS)
#endif
	ORQ 	$0x00080000, DI //add flag CLONE_SETTLS(0x00080000) to call clone

nog1:
	MOVL	$SYS_clone, AX // AX 存入系统调用 SYS_clone
	SYSCALL // 执行系统调用,进入内核

	// 虽然这里只有一次 clone 调用,但它却返回了2次,
	// 一次返回到父线程,一次返回到子线程,然后 2 个线程各自执行自己的代码流程。
	// In parent, return.
	CMPQ	AX, $0 // 返回值如果是 0 则表示这是子线程
	JEQ	3(PC) // 跳转到子线程部分,往下跳 3
	MOVL	AX, ret+40(FP) // 给父线程准备返回值到 AX
	RET // return 到父线程

	// In child, on new stack.
	MOVQ	SI, SP // 设置 CPU 栈顶寄存器指向子线程的栈顶 stk

	// If g or m are nil, skip Go-related setup.
	// m,新创建的m结构体对象的地址,由父线程保存在R8寄存器中的值被复制到了子线程
	CMPQ	R13, $0    // m
	JEQ	nog2
	// g,m.g0的地址,由父线程保存在R9寄存器中的值被复制到了子线程
	CMPQ	R9, $0    // g0
	JEQ	nog2

	// Initialize m->procid to Linux tid
	// 通过gettid系统调用获取线程ID(tid)
	MOVL	$SYS_gettid, AX
	SYSCALL // 执行系统调用,进入内核
	MOVQ	AX, m_procid(R13) // 设置 m.procid = tid

	// In child, set up new stack
	get_tls(CX) // 获取当前线程的 TLS 地址
	MOVQ	R13, g_m(R9)ux_amd // g0.m = m
	MOVQ	R9, g(CX) // tls.g = g0
	MOVQ	R9, R14 // set g register R14 = g0
	CALL	runtime·stackcheck(SB) // 栈检查

nog2:
	// Call fn. This is the PC of an ABI0 function.
	CALL	R12 // call mstart 函数,非错误情况不返回,会进入调度循环

	// It shouldn't return. If it does, exit that thread.
	// 发生错误而返回,需要退出线程
	MOVL	$111, DI
	MOVL	$SYS_exit, AX
	SYSCALL
	JMP	-3(PC)	// keep exiting
clone 函数的执行步骤解析:
- 首先用了几条指令为 clone 系统调用准备参数,存储到父线程寄存器中;第一个参数和第二个参数分别用来指定内核创建线程时需要的选项和新线程应该使用的栈。新线程使用的栈为 m.g0.stack.lo~m.g0.stack.hi 这段内存。参数三和参数四分别是与新线程绑定的 m对象和 g0,参数五表示 mstart 函数,存储在 R12 寄存器中,这个后边会用到。
- 使用 SYSCALL 指令进入系统内核,通过 SYS_clone 系统调用创建子线程;父子线程共享进程地址空间,父线程的寄存器会被复制一份给子线程,这样参数就会随着寄存器被传递。
- SYS_clone 系统调用创建完子线程后,会返回两次结果,一次返回到父线程,一次返回到子线程,然后 2 个线程各自执行自己的代码流程;当返回值 AX = 0 时,表示为子线程,否则为父线程;父线程结束 clone 任务后,将返回值放入 AX 中,最终执行了 RET,至此父线程回到 newosproc 函数继续执行其他逻辑。
- 子线程则跳转到后面的代码继续执行,进行后续的初始化工作,首先进行了栈内存的切换工作;该场景下寄存器中的 m 和 g0 不为 0,所以略过检查函数;随后通过系统调用获取子线程 ID,绑定到 m.procid;绑定 m 和 g0,使用 get_tls(CX) 获取当前线程的 TLS 地址,使用 MOVQ R9, g(CX) 绑定线程 tls 和 g0 的关系,R14 寄存器指向了 g0。
- 最后通过 CALL R12 调用 mstart,此后整个调度循环就可以运行起来了,至于 mstart 又是如何启动调度循环的,请移步到下一小节内容。
拓展知识
这里细心的同学会发现一个问题:系统线程的本地存储 TLS 地址指向了 g0,那 TLS 地址哪里的来的?换句话说:系统线程的本地存储存到什么地方去了(系统线程的 FS 段的段基址指向哪里了呢)?
按理来说 TLS 需要和 m.tls[1] 地址绑定,这样系统线程的 FS 段的段基址(TLS)就有地方存了,就能使用了;比如在启动第一个系统线程时,明明使用 runtime·settls(SB)对系统线程 TLS 和 m.tls[1] 进行了绑定,这里为什么没有绑定呢?
其实是因为这里有几条指令,我没有给出解释:
	LEAQ	m_tls(R13), R8
#ifdef GOOS_android
	// Android stores the TLS offset in runtime·tls_g.
	SUBQ	runtime·tls_g(SB), R8
#else
	ADDQ	$8, R8	// ELF wants to use -8(FS)
#endif
	ORQ 	$0x00080000, DI //add flag CLONE_SETTLS(0x00080000) to call clone
LEAQ m_tls(R13), R8R8 寄存器指向 m.tls 地址;- 对于 GOOS_android 系统,存储 tls 地方在 R8 - runtime·tls_g(SB);
- 对于其他系统都是使用 ELF(二进制文件格式)格式执行文件,需要偏移
ADDQ $8, R8,也就是 m.tls[1] 的地址; - 最后使用
ORQ $0x00080000, DI指令,ORQ 表示“按位或逻辑”,DI 指向 clone-flag 参数,0x00080000 = 100000000;这个指令表示在 clone 系统调用执行过程中加入 flag 参数CLONE_SETTLS。CLONE_SETTLS是一个标志,用于 Linux 中的 clone() 系统调用,它允许一个新创建的进程(通常是一个子进程)设置其自己的线程本地存储(TLS)。而 R8 寄存器估计就是在 clone 系统调用执行时传递的参数了,这样也就实现了与runtime·settls(SB)指令相同的功能。
4.一个线程的基本调度流程
前面讲述了 G、M、P 三个重要对象的启动或唤醒过程,接下来本小节将从整体角度带大家串一下最核心的循环调度流程是如何启动的,每个工作线程的执行流程和调度循环都一样,如下图所示:

上一小节讲到在一个新线程被创建、初始化完毕后,调用了 mstart 函数,mstart 直接调用了 mstart0 函数,mstart0 函数在初始化 g0 的 stackguard0、stackguard1 属性后,继续调用了 mstart1 函数:
// mstart is the entry-point for new Ms.
// It is written in assembly, uses ABI0, is marked TOPFRAME, and calls mstart0.
func mstart()

func mstart0() {
	gp := getg()

	...

	// Initialize stack guard so that we can start calling regular
	// Go code.
	gp.stackguard0 = gp.stack.lo + _StackGuard
	// This is the g0, so we can also call go:systemstack
	// functions, which check stackguard1.
	gp.stackguard1 = gp.stackguard0
	mstart1()

	// Exit this thread.
	if mStackIsSystemAllocated() {
		// Windows, Solaris, illumos, Darwin, AIX and Plan 9 always system-allocate
		// the stack, but put it in gp.stack before mstart,
		// so the logic above hasn't set osStack yet.
		osStack = true
	}
	mexit(osStack)
}
我们继续看一下 mstart1 函数的代码:
func mstart1() {
	gp := getg()

	if gp != gp.m.g0 {
		throw("bad runtime·mstart")
	}

    // 初始化 gp.sched
	gp.sched.g = guintptr(unsafe.Pointer(gp))
	gp.sched.pc = getcallerpc() // 获取 mstart1 执行完的返回地址
	gp.sched.sp = getcallersp() // 获取调用 mstart1 时的栈顶地址

	asminit() // 在AMD64 Linux平台中,这个函数什么也没做,是个空函数
	minit() // 与信号相关的初始化,目前不需要关心

	// Install signal handlers; after minit so that minit can
	// prepare the thread to be able to handle the signals.
	if gp.m == &m0 {
        // main 启动时_g_.m 是 m0,目前不是
		mstartm0()
	}

	if fn := gp.m.mstartfn; fn != nil {
        // 这个场景下:fn = mspinning,m 设置为自旋状态
		fn()
	}

	if gp.m != &m0 {
		acquirep(gp.m.nextp.ptr()) // 绑定 m 和 p
		gp.m.nextp = 0
	}

    // 启动调度循环
	schedule()
}
mstart1 函数执行主要流程:
- 在 mstart1 函数中设置 g0.sched.sp 和 g0.sched.pc 等调度信息,其中 g0.sched.sp 指向 mstart1 函数栈帧的栈顶,g0.sched.pc 指向 mstart1 函数执行完的返回地址,也就是 mstart0 函数中调用 mstart1 函数返回后的下一行指令的地址,对应着退出线程。
- 执行 gp.m.mstartfn 函数,此时对应 mspinning 函数,设置 m 为自旋状态。
- 非 m0 工作线程需要重新绑定空闲的 p,这里的 p 在创建线程的时候,事先放到了 m.nextp 中。
- 接着调用 schedule 函数,开始调度。
4.1 schedule 流程
我们继续看一下 schedule 的核心代码:
// One round of scheduler: find a runnable goroutine and execute it.
// Never returns.
func schedule() {
	mp := getg().m

	...

top:
	pp := mp.p.ptr()
	pp.preempt = false

	// Safety check: if we are spinning, the run queue should be empty.
	// Check this before calling checkTimers, as that might call
	// goready to put a ready goroutine on the local run queue.
	if mp.spinning && (pp.runnext != 0 || pp.runqhead != pp.runqtail) {
		throw("schedule: spinning with local work")
	}

    // 调度策略 findRunnable :获取一个可运行的 G
    // 获取不到 G ,会通过 stopm() 进入休眠状态,和前面 M 的唤醒连接起来了
    // 具体如何获取,下一篇再讲
	gp, inheritTime, tryWakeP := findRunnable() // blocks until work is available

	// 如果 m 为自旋状态,设置为非自旋(因为找到 G 了),然后尝试唤醒一个 p
	if mp.spinning {
		resetspinning()
	}

	...

	// 非普通 G 如 GCworker,可以尝试唤醒一个 P
	if tryWakeP {
		wakep()
	}

    ...

	execute(gp, inheritTime)
}
在 schedule 函数中根据调度策略(findRunnable 函数,这里就不展开了)选择一个可运行的 g;随后调用 execute 函数,执行调度。
func execute(gp *g, inheritTime bool) {
	mp := getg().m

	...

	// 绑定 m 和 g
	mp.curg = gp
	gp.m = mp
	casgstatus(gp, _Grunnable, _Grunning) // g 设置为正在运行状态

    ...
	// 切换 g0 到 g,执行用户代码
	gogo(&gp.sched)
}
在 execute 函数中:
- 先将 g 和 m 绑定起来;
- 然后将 g 由 _Grunnable 改变为 _Grunning;
- 调用 gogo 函数,切换 g 的执行权。
4.2 gogo 函数
到这里调度器又要开大招了,gogo 函数是一个非常关键的函数,与其对应的还有一个 mcall 函数,我们先来看一张图:

在整个调度流程中,存在很关键的一点,就是关于 g0 和 g 执行权和栈的相互切换,如上图所示,g0 切换到 g 使用 gogo()函数,而 g 切换回 g0 使用 mcall(fn func(*g))函数,这俩函数实现原理类似,只不过过程刚好相反,这里我们先分析 gogo 源码,后续再看 mcall:(不知道你有没有看吐,我已经快写吐了,哈哈哈,在坚持一下!)源码:runtime/asm_amd64.s 401
// func gogo(buf *gobuf)
// restore state from Gobuf; longjmp
TEXT runtime·gogo(SB), NOSPLIT, $0-8
	MOVQ	buf+0(FP), BX		// gobuf 对应 gp.sched
	MOVQ	gobuf_g(BX), DX // DX = gp.sched.g
	MOVQ	0(DX), CX		// make sure g != nil
	JMP	gogo<>(SB) // 跳转

TEXT gogo<>(SB), NOSPLIT, $0
	get_tls(CX) // 获取线程本地存储地址,里边存着 g0
	MOVQ	DX, g(CX) // 把当前 g 写入 tls,替代 g0
	MOVQ	DX, R14		// set the g register R14 寄存器一直存m 当前使用的 g
	// restore SP 切换 CPU 的 SP 栈顶到 g 的栈顶 gobuf_sp,完成栈的切换
	MOVQ	gobuf_sp(BX), SP
	MOVQ	gobuf_ret(BX), AX // 系统调用的返回值放入AX寄存器
	MOVQ	gobuf_ctxt(BX), DX
	MOVQ	gobuf_bp(BX), BP // 恢复了 CPU 的栈基地址寄存器 BP
	// 相关寄存器都放入 CPU 寄存器了,不需要的成员设置为0,这样可以减少gc的工作量
	MOVQ	$0, gobuf_sp(BX)	// clear to help garbage collector
	MOVQ	$0, gobuf_ret(BX)
	MOVQ	$0, gobuf_ctxt(BX)
	MOVQ	$0, gobuf_bp(BX)
	// 把 gp.sched.pc 的值读取到BX寄存器
	MOVQ	gobuf_pc(BX), BX
	JMP	BX // 执行 gp.sched.pc
我们来看看 gogo 都干了些什么:
- g0 调用 gogo() 函数时,首先将线程 tls 的 g0 替换为了 g;
- 然后通过设置 CPU 的栈顶寄存器 SP 为 g.sched.sp,实现了从 g0 栈到 g 栈的切换;保存了其他 gobuf 内的寄存器到 CPU 对应的寄存器,为后续调用 g 做准备;
- 最后从 g 中取出 g.sched.pc 的值,并通过 JMP 指令从 runtime 代码直接跳转到用户代码执行,完成了 CPU 执行权的转让。
还记得 g.sched.pc 指向的了啥不?不记得可以回头再看看 G 的创建,g.sched.pc 指向了 go 关键字后边的函数的 fn.fn 指针,也就是执行的第一条指令,cpu 从这里开始运行起来了用户程序代码!!!(皆大欢喜)
4.3 G 运行用户程序代码
讲述了 CPU 如何运行了 G 所持有的用户代码,当用户代码正常运行结束,又会发生什么呢?(这里暂时不考虑抢占、主动调度和被动调度的情况)
我们都知道 go 关键字后边是一个函数 func,自然会有其对应的函数栈调用,当其运行结束,自然会调用 RET 指令,回到 return address 处继续执行(不理解的可以看 13. 入门 go 语言汇编,看懂 GMP 源码 这篇文章),那 return address 又指向的了哪里呢?请看 G 的创建小节的内容,我们会发现 return address 指向了 CALL runtime·goexit1(SB) 。因此正常结束的 G 会从这里继续开始执行 goexit1 函数:
源码地址:src/runtime/proc.go : 3634
// Finishes execution of the current goroutine.
func goexit1() {
	if raceenabled {
		racegoend()
	}
	if trace.enabled {
		traceGoEnd()
	}
	mcall(goexit0)
}
我们会发现 goexit1 函数继续调用了 mcall(goexit0),这个函数在讲 gogo 的时候已经提到过了,我们来分析一下吧!
4.4 mcall(goexit0) 函数
mcall 主要作用是切换 g0 的执行权和栈内存,然后执行 goexit0 函数。
源码:runtime/asm_amd64.s 424
// func mcall(fn func(*g))
// Switch to m->g0's stack, call fn(g).
// Fn must never return. It should gogo(&g->sched)
// to keep running g.
TEXT runtime·mcall<ABIInternal>(SB), NOSPLIT, $0-8
	MOVQ	AX, DX	// DX = fn 它是funcval对象的指针,此场景中fn.fn是 goexit0 的地址

	// save state in g->sched
	// 保存 g 的 sched 状态,有可能还切换回来
	MOVQ	0(SP), BX	// caller's PC 存储到 BX
	// R14 里存储着 g
	MOVQ	BX, (g_sched+gobuf_pc)(R14) // g.sched.pc = caller's PC
	LEAQ	fn+0(FP), BX	// caller's SP 存储到 BX
	MOVQ	BX, (g_sched+gobuf_sp)(R14) // g.sched.sp = caller's SP
	MOVQ	BP, (g_sched+gobuf_bp)(R14) // g.sched.bp = caller's BP

	// switch to m->g0 & its stack, call fn
	MOVQ	g_m(R14), BX  // BX = m
	MOVQ	m_g0(BX), SI	// SI = g.m.g0
	CMPQ	SI, R14	// if g == m->g0 call badmcall(g 不能是 g0)
	JNE	goodm
	JMP	runtime·badmcall(SB)
goodm:
	MOVQ	R14, AX		// AX (and arg 0) = g
	MOVQ	SI, R14		// g = g.m.g0; R14 存入 g0
	get_tls(CX)		// Set G in TLS
	MOVQ	R14, g(CX) // tls 存入 g0
	MOVQ	(g_sched+gobuf_sp)(R14), SP	// sp = g0.sched.sp 切换 CPU 栈顶
	PUSHQ	AX	// open up space for fn's arg spill slot
	MOVQ	0(DX), R12 // R12 = goexit0
	CALL	R12		// fn(g) 执行 goexit0,这里不会返回
	POPQ	AX
	JMP	runtime·badmcall2(SB)
	RET
我们来看看 mcall 函数都干了什么:
- 保存当前 g 的现场环境 g.sched 中寄存器们的值,有些场景还需要唤醒 g (比如 channel);
- 校验 g !=g0;
- 切换 tls 的 g 为 g0;切换 g0 的栈(由于每次调用 mcall 函数切换到 g0 栈时,都是切换到 g0.sched.sp 所指的固定位置,因此 g0 栈内存是覆盖重复使用的,不会因为函数不返回问题导致爆栈);调用 goexit0 函数。
4.5 goexit0 函数
快结束了,我们继续看看 goexit0 又干了什么?
// goexit continuation on g0.
func goexit0(gp *g) {
	mp := getg().m
	pp := mp.p.ptr()

	casgstatus(gp, _Grunning, _Gdead) // g马上退出,所以设置其状态为_Gdead
	gcController.addScannableStack(pp, -int64(gp.stack.hi-gp.stack.lo))
	if isSystemGoroutine(gp, false) {
		sched.ngsys.Add(-1)
	}

     // 清空 g 保存的一些信息
	gp.m = nil
	locked := gp.lockedm != 0
	gp.lockedm = 0
	mp.lockedg = 0
	gp.preemptStop = false
	gp.paniconfault = false
	gp._defer = nil // should be true already but just in case.
	gp._panic = nil // non-nil for Goexit during panic. points at stack-allocated data.
	gp.writebuf = nil
	gp.waitreason = waitReasonZero
	gp.param = nil
	gp.labels = nil
	gp.timer = nil

	...

	dropg() // g->m = nil, m->currg = nil 解绑 g 和 m 之间的关系

	...
    // g 放入 p 的 freeg 队列,方便下次重用,免得再去申请内存,提高效率
	gfput(pp, gp)

	...
    // 开启调度循环
	schedule()
}
goexit0 函数主要逻辑:
- 设置 G 状态为_Gdead;
- 重置 G 保存的信息,以便下一次复用;
- 解绑 G 和 M 的关系;
- G 被放入 P 的 freeg,等待下一次复用;
- 调用 schedule 开启调度循环。
至此一条函数循环调用链形成:gogo -> go(用户程序) ->goexit -> goexit1 -> mcall(goexit0) -> goexit0(gp *g) -> schedule();
5.GMP 状态变更
我们已经初步的了解了一部分 GMP 源码,这里对 G、M、P 涉及的状态变化做一个总结,以便你更好地理解 GMP 调度过程!
5.1 G 的状态变更
本文通过对 G 的创建、调度的分析,我们能得出如下一张 G 状态变更图:

通过这张图,我们发现本篇文章只涉及 G 的四个状态变更,还有两个重要的状态还没有聊到,后续我们慢慢补全!我们先总结一下本篇文章涉及到的内容:
- go 关键字会触发 newproc 函数创建 G,如果 p.freeg 中包含 G 则不需要重新申请内存,直接复用 G,此时 G 为 _Gdead 状态;否则使用 malg 函数创建一个 G,此时 G 为 _Gidle, malg 为 G 申请完内存后,更改其状态为 _Gdead。
- 随后通过 newproc1 函数为 G 初始化 g.sched 的相关运行环境参数,初始化完成后 G 变为可执行 _Grunnable,随后通过 runqput 函数将其放入可执行队列中,等待被调度执行。
- M 通过 schedule 选择一个可以执行的 G,放入 execute 函数中执行,此时 G 状态被变更为 _Grunning,通过 gogo 切换执行权限后,G 开始顺利执行。
- G 顺利执行完毕,回调 goexit1 -> mcall(goexit0) -> goexit0(gp *g) 函数,最终重置 G 的参数,将 G 加入 p.freeg 队列中,等待被复用,此时 G 状态为 _Gdead。
5.2 M 的状态变更
M 的状态可以简化为只有两种:自旋和非自旋;自旋状态,表示 M 绑定了 P,却从 P 和全局运行队列都没有获取到可运行的 G,处于寻找 G 的状态;非自旋状态,表示正在执行 Go 代码中,或正在进入系统调用,或空闲。
M 的自旋数量是判断是否唤醒空闲 P 的关键参数!本文讲到,通过 startm -> newm 新建一个 M 的时候,初始状态为非自旋状态,调用 mstart1 -> mspinning 设置为自旋状态。当 schedule 函数中找到可运行的 G 时,则切换为非自旋状态。

5.3 P 的状态变更
本文涉及的 P 状态变更只有一个,使用 acquirep 函数,设置 p 的状态从 _Pidle� 变为 _Prunning。其他状态我们暂未涉及,后续文章再补齐状态变更!
总结
Go 语言有强大的并发能力,能够简单的通过 go 关键字创建大量的轻量级协程 Goroutine,帮助程序快速执行各种任务,今天带大家把 GMP 调度器的部分底层源码学习一遍,收获颇深,这里来总结一下本篇文章的重要内容!
- 为了解决 Go 早期多线程 M 对应多协程 G 调度器的全局锁带来的锁竞争导致的性能下降等问题,Go 开发者引入了处理器 P 结构,形成了当前经典的 GMP 调度模型,该模型引入了本地运行队列(可以通过 CAS 做到无锁访问)和局部优先原则。
- Go 调度器指的是由 G、M、P 以及 schedt 对象和函数等组成的一种机制,目的是高效地调度 G 到 M上去执行。P 数量一般和 CPU 数量保持一致,用于控制最大并行数量,M 必须得绑定 P 才能执行 G。
- Go 调度器的核心思想是:尽可能复用线程 M,避免频繁的线程创建和销毁;利用多核并行能力,限制同时运行(不包含阻塞)的 M 线程数 等于 CPU 的核心数目,也就是 P 的数量。
- 调度策略本篇文章没有涉及到,会在后续文章专门分享,这里提前透露一下:M 优先执行其所绑定的 P 的本地运行队列中的 G,如果本地队列没有 G,则会从全局队列获取,为了提高效率和负载均衡,会从全局队列获取多个 G,而不是只取一个,个数是自己应该从全局队列中承担的;Work Stealing 任务窃取机制,M 可以从其他 M 绑定的 P 的运行队列偷取 G 执行;Hand Off 交接机制,为了提高效率,M 阻塞时,会将 M 上 P 的运行队列交给其他 M 执行;基于协作的抢占机制,为了保证公平性和防止 Goroutine 饥饿问题,Go 程序会保证每个 G 运行 10ms 就让出 M,交给其他 G 去执行。
- 调度的局部性优化:新创建的 G 放入 runnext 槽中,被替换的 G 优先放入本地队列,在本地队列满了时,会将本地队列的一半 G 和新创建的 G 打乱顺序,一起放入全局队列。
- G、M、P 启动、运转的相关函数和状态变化,上边已经分析了,且画成了图,这里就不展开了。
- 正常结束 G 的调度循环:gogo -> go(用户程序) ->goexit -> goexit1 -> mcall(goexit0) -> goexit0(gp *g) -> schedule();非正常结束的 G,我们后续再聊!
下一篇文章我们将聊一聊在 Go 调度器中,main 函数主流程是如何加载启动的,启动过程中又发生了什么有趣的事情!
阅读量:615
点赞量:0
收藏量:0