后端框架搭建——从零开始搭建一个高颜值后台管理系统全栈框架(二)-灵析社区
 lucky0-0
前言
上期已经说过,我们这个后台管理系统的后端框架采用midwayjs,作为一个从.net后端转前端的我来说,这个框架用起来真的很简单,语法和.net和java差不多。这篇文章主要针对对midway不了解的人群,按照下面的教程不用看官方文档也能轻轻松松入门。
midway介绍
Midway 是阿里巴巴 - 淘宝前端架构团队,基于渐进式理念研发的 Node.js 框架,通过自研的依赖注入容器,搭配各种上层模块,组合出适用于不同场景的解决方案。
Midway 基于 TypeScript 开发,结合了面向对象(OOP + Class + IoC)与函数式(FP + Function + Hooks)两种编程范式,并在此之上支持了 Web / 全栈 / 微服务 / RPC / Socket / Serverless 等多种场景,致力于为用户提供简单、易用、可靠的 Node.js 服务端研发体验。
简单例子
// src/controller/home.ts
import { Controller, Get } from '@midwayjs/core';
import { Context } from '@midwayjs/koa';

@Controller('/')
export class HomeController {

  @Inject()
  ctx: Context

  @Get('/')
  async home() {
    return {
      message: 'Hello Midwayjs!',
      query: this.ctx.ip
    }
  }
}
搭建项目
初始化项目
- 使用
npm init midway查看完整的脚手架列表,选中某个项目后,Midway 会自动创建示例目录,代码,以及安装依赖。

这里选koa3

然后输入项目名称,回车后,项目会自动使用npm install安装依赖,如果不想使用npm,这里可以停掉,然后自己在项目里执行pnpm install安装依赖。如果安装完成后启动失败,执行pnpx midway-version -u -w命令后,然后再重新安装依赖,然后就能正常启动了。


将下面代码覆盖掉.vscode/launch.json文件内容
{
    // 使用 IntelliSense 了解相关属性。
    // 悬停以查看现有属性的描述。
    // 欲了解更多信息,请访问: https://go.microsoft.com/fwlink/?linkid=830387
    "version": "0.2.0",
    "configurations": [{
        "name": "Midway Local",
        "type": "node",
        "request": "launch",
        "cwd": "${workspaceRoot}",
        "runtimeExecutable": "npm",
        "windows": {
            "runtimeExecutable": "npm.cmd"
        },
        "runtimeArgs": [
            "run",
            "dev"
        ],
        "env": {
            "NODE_ENV": "local"
        },
        "console": "integratedTerminal",
        "protocol": "auto",
        "restart": true,
        "port": 7001,
        "autoAttachChildProcesses": true
    }]
}
启动项目


数据库mysql
安装mysql数据库
数据库选用mysql,为了方便,我们使用docker启动mysql服务。
- 到官网下载
docker desktop,并安装。

安装完docker desktop,然后打开docker desktop,搜索mysql,然后拉取镜像。

启动mysql服务

配置数据库密码、数据映射卷和端口映射

使用typeorm
TypeORM是node.js现有社区最成熟的对象关系映射器(ORM )。
- 安装 typeorm 组件,提供数据库 ORM 能力。 sh复制代码pnpm i @midwayjs/typeorm@3 typeorm --save
- 在src/configuration.ts引入 orm 组件

安装数据库Driver
pnpm install mysql2 --savetypeorm配置
修改src/config/config.default.ts文件
import { MidwayConfig } from '@midwayjs/core';

export default {
  // use for cookie sign key, should change to your own and keep security
  keys: '1684629293601_5943',
  koa: {
    port: 7001,
  },
  typeorm: {
    dataSource: {
      default: {
        /**
         * 单数据库实例
         */
        type: 'mysql',
        host: 'localhost', // 数据库ip地址,本地就写localhost
        port: 3306,
        username: 'root',
        password: '123456',
        database: 'test', // 数据库名称
        synchronize: true, // 如果第一次使用,不存在表,有同步的需求可以写 true,注意会丢数据
        logging: true,
        // 扫描entity文件夹
        entities: ['**/entity/*{.ts,.js}'],
      },
    },
  },
} as MidwayConfig;
使用DBeaver连接mysql,创建数据库
mysql客户端推荐使用Navicat,但是这个收费。只好找一个免费并且好用的客户端,DBeaver还挺好用的。
- 创建连接


创建实体模型
- 新建entity文件夹,然后创建user.ts文件 ts复制代码// ./src/entity/user.ts import { Column, PrimaryGeneratedColumn } from 'typeorm'; export class User { @PrimaryGeneratedColumn() // 主键自增列 id: number; @Column() // 普通列 name: string; @Column() // 普通列 age: number; }
- 启动项目,可以发现表自动创建了

测试一下typeorm,改造src/controller/home.controller.ts文件
// ./src/controller/home.controller.ts
import { Controller, Get } from '@midwayjs/core';
import { InjectEntityModel } from '@midwayjs/typeorm';
import { User } from '../entity/user';
import { Repository } from 'typeorm';

@Controller('/')
export class HomeController {
  // 自动注入模型
  @InjectEntityModel(User)
  userModel: Repository<User>;

  @Get('/')
  async home(): Promise<User[]> {
    // 查询user表数据
    return await this.userModel.find();
  }
}启动项目,访问http://127.0.0.1:7001/,因为没有数据返回空数组。

可以在控制台中查看生成sql,有利于调试复杂的sql

手动在数据库中添加一条数据,再测试一下。


缓存redis
redis的作用
- 下面是chatgpt给出的答案 Redis 是一个开源的内存数据结构存储系统,也是一种 NoSQL 数据库。它支持多种数据结构,包括字符串、哈希表、列表、集合和有序集合,并提供了丰富的操作接口。 Redis 主要用于以下几个方面: 缓存:Redis 可以将热点数据存储在内存中,加速读写访问速度。对于需要频繁读取的数据,将其缓存到 Redis 中可以大大降低数据库的访问负载,提高性能。 分布式锁:Redis 的原子性操作保证了分布式锁的实现,在分布式环境下确保资源的互斥访问,防止因并发访问而导致的数据错乱或冲突。 消息队列:Redis 提供了 List 和 Pub/Sub 两种模式,可以实现简单的消息队列与发布订阅功能。 计数器:使用 Redis 的自增或者自减操作可以实现计数器的功能。在高并发场景下,使用 Redis 实现计数器可以避免线程安全问题。 搜索引擎:Redis 的 Sorted Set 可以很好地支持搜索引擎的实现。例如,可以将文章的关键词作为 Score 存储到 Sorted Set 中,然后根据用户的搜索关键字来查询相关文章。 游戏服务器:Redis 可以存储游戏中的数据、状态等信息,并提供快速的读写访问能力,支持高并发的游戏服务器。 总之,Redis 作为一种高性能的内存数据库,可以用于多种场景下的数据存储和处理。它具有高效、可扩展、易用等特点,在互联网领域得到广泛应用。
- 使用docker desktop安装redis

启动redis服务-

使用redis客户端测试,推荐redis客户端使用Another Redis Desktop Manager。


- 可以看到已经连接成功了
- 在项目中安装redis依赖
pnpm i @midwayjs/redis@3 --save引入redis组件,在 src/configuration.ts 中导入
import { Configuration } from '@midwayjs/core';
import * as redis from '@midwayjs/redis';
import { join } from 'path';

@Configuration({
  imports: [
    // ...
    redis       // 导入 redis 组件
  ],
  importConfigs: [
    join(__dirname, 'config')
  ],
})
export class MainConfiguration {
}
配置redis
// src/config/config.default.ts
export default {
  // ...
  redis: {
    client: {
      port: 6379, // Redis port
      host: 'localhost', // Redis host
      password: '123456',
      db: 0,
    },
  },
}
代码中使用redis服务
import { Controller, Get, Inject } from '@midwayjs/core';
import { RedisService } from '@midwayjs/redis';

@Controller('/')
export class HomeController {
  // 自动注入redis服务
  @Inject()
  redisService: RedisService;

  @Get('/')
  async home(): Promise<string> {
    // 设置值
    await this.redisService.set('foo', 'bar');
    // 获取值
    return await this.redisService.get('foo');
  }
}
验证


- swagger ui Swagger是一个规范和完整的框架,用于生成、描述、调用和可视化 RESTful 风格的 Web 服务。它可以在线自动生成接口文档,以及快速测试接口。
- 安装依赖
pnpm install @midwayjs/swagger@3 --save
pnpm install swagger-ui-dist --save-dev- 导入组件
import { Configuration } from '@midwayjs/core';
import * as swagger from '@midwayjs/swagger';

@Configuration({
  imports: [
    // ...
    {
      component: swagger,
      enabledEnvironment: ['local']
    }
  ]
})
export class MainConfiguration {

}
- 然后启动项目,访问地址: UI: http://127.0.0.1:7001/swagger-ui/index.html JSON: http://127.0.0.1:7001/swagger-ui/index.json
- 效果展示


- 这里我们使用swagger-ui对接口进行快速测试,后续会使用swagger生成接口文档。
国际化
前端框架都做了国际化,后端肯定也是要做的,midway已经内置了国际化方案,我们直接用就行了。
- 安装依赖
pnpm i @midwayjs/i18n@3 --save导入组件
import { Configuration } from '@midwayjs/core';
import * as i18n from '@midwayjs/i18n';

@Configuration({
  imports: [
    // ...
    i18n
  ]
})
export class MainConfiguration {
  //...
}
配置多语言文案 在src目录下,新建locales目录,在locales目录下,新建en_US.json文件和zh_CN.json文件。
// src/locales/en_US.json
{
  "hello": "hello"
}
// src/locales/zh_CN.json
{
  "hello": "你好"
}
配置i18n
// src/config/config.default.ts
export default {
  // ...
  i18n: {
    // 把你的翻译文本放到这里
    localeTable: {
      en_US: require('../locales/en_US'),
      zh_CN: require('../locales/zh_CN'),
    },
  }
}
测试
import { Controller, Get, Inject } from '@midwayjs/core';
import { MidwayI18nService } from '@midwayjs/i18n';

@Controller('/')
export class HomeController {
  // 自动注入i18n服务
  @Inject()
  i18nService: MidwayI18nService;

  @Get('/')
  async home(): Promise<string> {
    // 获取值
    return this.i18nService.translate('hello', {
      locale: 'en_US',
    });
  }
}


参数校验
midway内置了参数校验组件,主要是不想在业务代码中增加一些重复的判断语句,把校验和模型绑定到一起。

安装依赖
pnpm i @midwayjs/validate@3 --save导入组件
// configuration.ts
import { Configuration, App } from '@midwayjs/core';
import * as koa from '@midwayjs/koa';
import * as validate from '@midwayjs/validate';
import { join } from 'path';

@Configuration({
  imports: [koa, validate],
  importConfigs: [join(__dirname, './config')],
})
export class MainConfiguration {
  @App()
  app: koa.Application;

  async onReady() {
    // ...
  }
}
使用校验组件并测试
首先在src下新建dto目录,新建user.ts文件
// src/dto/user.ts
import { Rule, RuleType } from '@midwayjs/validate';

export class UserDTO {
@Rule(RuleType.number().required())  // id不能为空,并且是数字
id: number;

@Rule(RuleType.number().max(60))     // 年龄字段必须是数字,并且不能大于60
age: number;
}
// src/controller/home.controller.ts
import { Body, Controller, Post } from '@midwayjs/core';
import { UserDTO } from '../dto/user';

@Controller('/')
export class HomeController {
    @Post('/')
    async home(@Body() user: UserDTO): Promise<void> {
        console.log(user);
    }
}
使用swagger-ui测试一下,先传一个空对象给后端

可以看到返回给前端的状态不是200,而是422了

传入id测试一下

控制台没有报错,并且把user打印了出来

自定义报错消息
// src/dto/user.ts
import { Rule, RuleType } from '@midwayjs/validate';

export class UserDTO {
  @Rule(RuleType.number().required().error(new Error('不能为空啊啊啊啊啊'))) // id不能为空,并且是数字
  id: number;

  @Rule(RuleType.number().max(60)) // 年龄字段必须是数字,并且不能大于60
  age: number;
}

- 校验报错信息国际化 官网文档已经写的很详细了,我这边就不说了。自定义消息的多语言,官网上没写,这个在下面错误拦截器里面处理。
异常处理
可以看到,上面参数校验失败时返回出去的是一串html,这个对于前端来说不好解析,这时候我们我们需要拦截然后返回给前端统一json格式。
Midway提供了一个内置的异常处理器,负责处理应用程序中所有未处理的异常。当您的应用程序代码抛出一个异常处理时,该处理器就会捕获该异常,然后等待用户处理。
异常处理器的执行位置处于中间件之后,所以它能拦截所有的中间件和业务抛出的错误。
- 在filter文件夹下,创建validate.filter.ts文件,拦截校验失败的错误
// src/filter/validate.filter.ts
import { Catch } from '@midwayjs/decorator';
import { MidwayValidationError } from '@midwayjs/validate';
import { Context } from '@midwayjs/koa';
import { MidwayI18nService } from '@midwayjs/i18n';

@Catch(MidwayValidationError)
export class ValidateErrorFilter {
  async catch(err: MidwayValidationError, ctx: Context) {
    // 获取国际化服务
    const i18nService = await ctx.requestContext.getAsync(MidwayI18nService);
    // 翻译
    const message = i18nService.translate(err.message) || err.message;
    // 未捕获的错误,是系统错误,错误码是500
    ctx.status = 422;
    return {
      code: 422,
      message,
    };
  }
}
在configuration.ts文件中,注册刚才我们创建的过滤器

测试一下

对error做多语言

// src/common/common.error.ts
import { MidwayError } from '@midwayjs/core';

export class CommonError extends MidwayError {
  constructor(message: string) {
    super(message);
  }
}在filter新建common.filter.ts文件
// src/filter/common.error.ts
import { Catch } from '@midwayjs/decorator';
import { Context } from '@midwayjs/koa';
import { CommonError } from '../common/common.error';
import { MidwayI18nService } from '@midwayjs/i18n';

@Catch(CommonError)
export class CommonErrorFilter {
  async catch(err: CommonError, ctx: Context) {
    // 获取国际化服务
    const i18nService = await ctx.requestContext.getAsync(MidwayI18nService);
    // 翻译
    const message = i18nService.translate(err.message) || err.message;
    // 未捕获的错误,是系统错误,错误码是500
    ctx.status = 400;
    return {
      code: 400,
      message,
    };
  }
}
在src/configuration.ts中注册过滤器

测试
// src/controller/home.controller.ts
import { Controller, Inject, Post } from '@midwayjs/core';
import { ILogger } from '@midwayjs/logger';
import { CommonError } from '../common/common.error';

@Controller('/')
export class HomeController {
  @Inject()
  logger: ILogger;

  @Post('/')
  async home(): Promise<void> {
    throw new CommonError('error');
  }
}

这里先这样简单使用,后面会封装公共的抛出异常方法,减少代码量。
日志
对于后端来说日志还是很重要的,有利于后期定位线上bug,midway也内置了一套日志组件,用起来很简单。
import { Body, Controller, Inject, Post } from '@midwayjs/core';
import { UserDTO } from '../dto/user';
import { ILogger } from '@midwayjs/logger';

@Controller('/')
export class HomeController {
  @Inject()
  logger: ILogger;

  @Post('/')
  async home(@Body() user: UserDTO): Promise<void> {
    this.logger.info('hello');
    console.log(user);
  }
}


除了支持info方法,还支持error、warn、debug方法,它们的具体用法,请查看官网文档。
实战
下面我们开始实战了,做一个简单但是完整的增删改查功能。
创建实体
// src/entity/user.ts
import {
  Column,
  Entity,
  PrimaryGeneratedColumn,
  CreateDateColumn,
  UpdateDateColumn,
} from 'typeorm';

@Entity('user')
export class User {
  @PrimaryGeneratedColumn()
  id: number;
  @Column({ comment: '姓名' })
  name: string;
  @Column({ comment: '年龄' })
  age: number;
  @CreateDateColumn({ comment: '创建日期' })
  create_date: Date;
  @UpdateDateColumn({ comment: '更新日期' })
  update_date: Date;
}
创建DTO,前端向后端传送数据的模型。
// src/dto/user.ts
import { ApiProperty } from '@midwayjs/swagger';
import { Rule, RuleType } from '@midwayjs/validate';

export class UserDTO {
  @ApiProperty({
    description: 'id',
  })
  @Rule(RuleType.allow(null))
  id?: number;
  @ApiProperty({
    description: '姓名',
  })
  @Rule(RuleType.string().required().error(new Error('姓名不能为空'))) // 这个错误消息正常需要做多语言的,这里demo偷懒不做了
  name: string;
  @ApiProperty({
    description: '年龄',
  })
  @Rule(RuleType.number().required().error(new Error('年龄不能为空')))
  age: number;
}
创建service
// src/service/user.service.ts
import { Provide } from '@midwayjs/core';
import { FindOptionsWhere, Repository } from 'typeorm';
import { User } from '../entity/user';
import { InjectEntityModel } from '@midwayjs/typeorm';

@Provide()
export class UserService {
  @InjectEntityModel(User)
  userModel: Repository<User>;

  // 新增
  async create(user: User) {
    await this.userModel.save(user);
    return user;
  }

  // 删除
  async remove(user: User) {
    await await this.userModel.remove(user);
  }

  // 修改
  async edit(user: User): Promise<User> {
    return await this.userModel.save(user);
  }

  // 分页查询
  async page(page: number, pageSize: number, where?: FindOptionsWhere<User>) {
    // 按照创建日期倒序返回
    const order: any = { create_date: 'desc' };

    const [data, total] = await this.userModel.findAndCount({
      order,
      skip: page * pageSize,
      take: pageSize,
      where,
    });

    return { data, total };
  }

  // 根据查询条件返回全部
  async list(where?: FindOptionsWhere<User>) {
    const order: any = { create_time: 'desc' };
    const data = await this.userModel.find({
      where,
      order,
    });

    return data;
  }
}
创建controller
// src/controller/user.controller.ts
import {
  Body,
  Controller,
  Get,
  Inject,
  Post,
  Provide,
  Query,
  ALL,
  Put,
  Param,
  Del,
} from '@midwayjs/decorator';
import { Validate } from '@midwayjs/validate';
import { UserDTO } from '../dto/user';
import { UserService } from '../service/user.service';
import { User } from '../entity/user';

@Provide()
@Controller('/user')
export class UserController {
  @Inject()
  userService: UserService;

  @Post('/')
  @Validate()
  async create(@Body(ALL) data: UserDTO) {
    const user = new User();
    user.name = data.name;
    user.age = data.age;

    return await this.userService.create(user);
  }

  @Put('/')
  @Validate()
  async edit(@Body(ALL) data: UserDTO) {
    const user = await this.userService.getById(data.id);
    // update
    user.name = data.name;
    user.age = data.age;
    return await this.userService.edit(user);
  }

  @Del('/:id')
  async remove(@Param('id') id: number) {
    const user = await this.userService.getById(id);
    await this.userService.remove(user);
  }

  @Get('/:id')
  async getById(@Param('id') id: number) {
    return await this.userService.getById(id);
  }

  @Get('/page')
  async page(@Query('page') page: number, @Query('size') size: number) {
    return await this.userService.page(page, size);
  }

  @Get('/list')
  async list() {
    return await this.userService.list();
  }
}
启动项目,使用swagger-ui测试
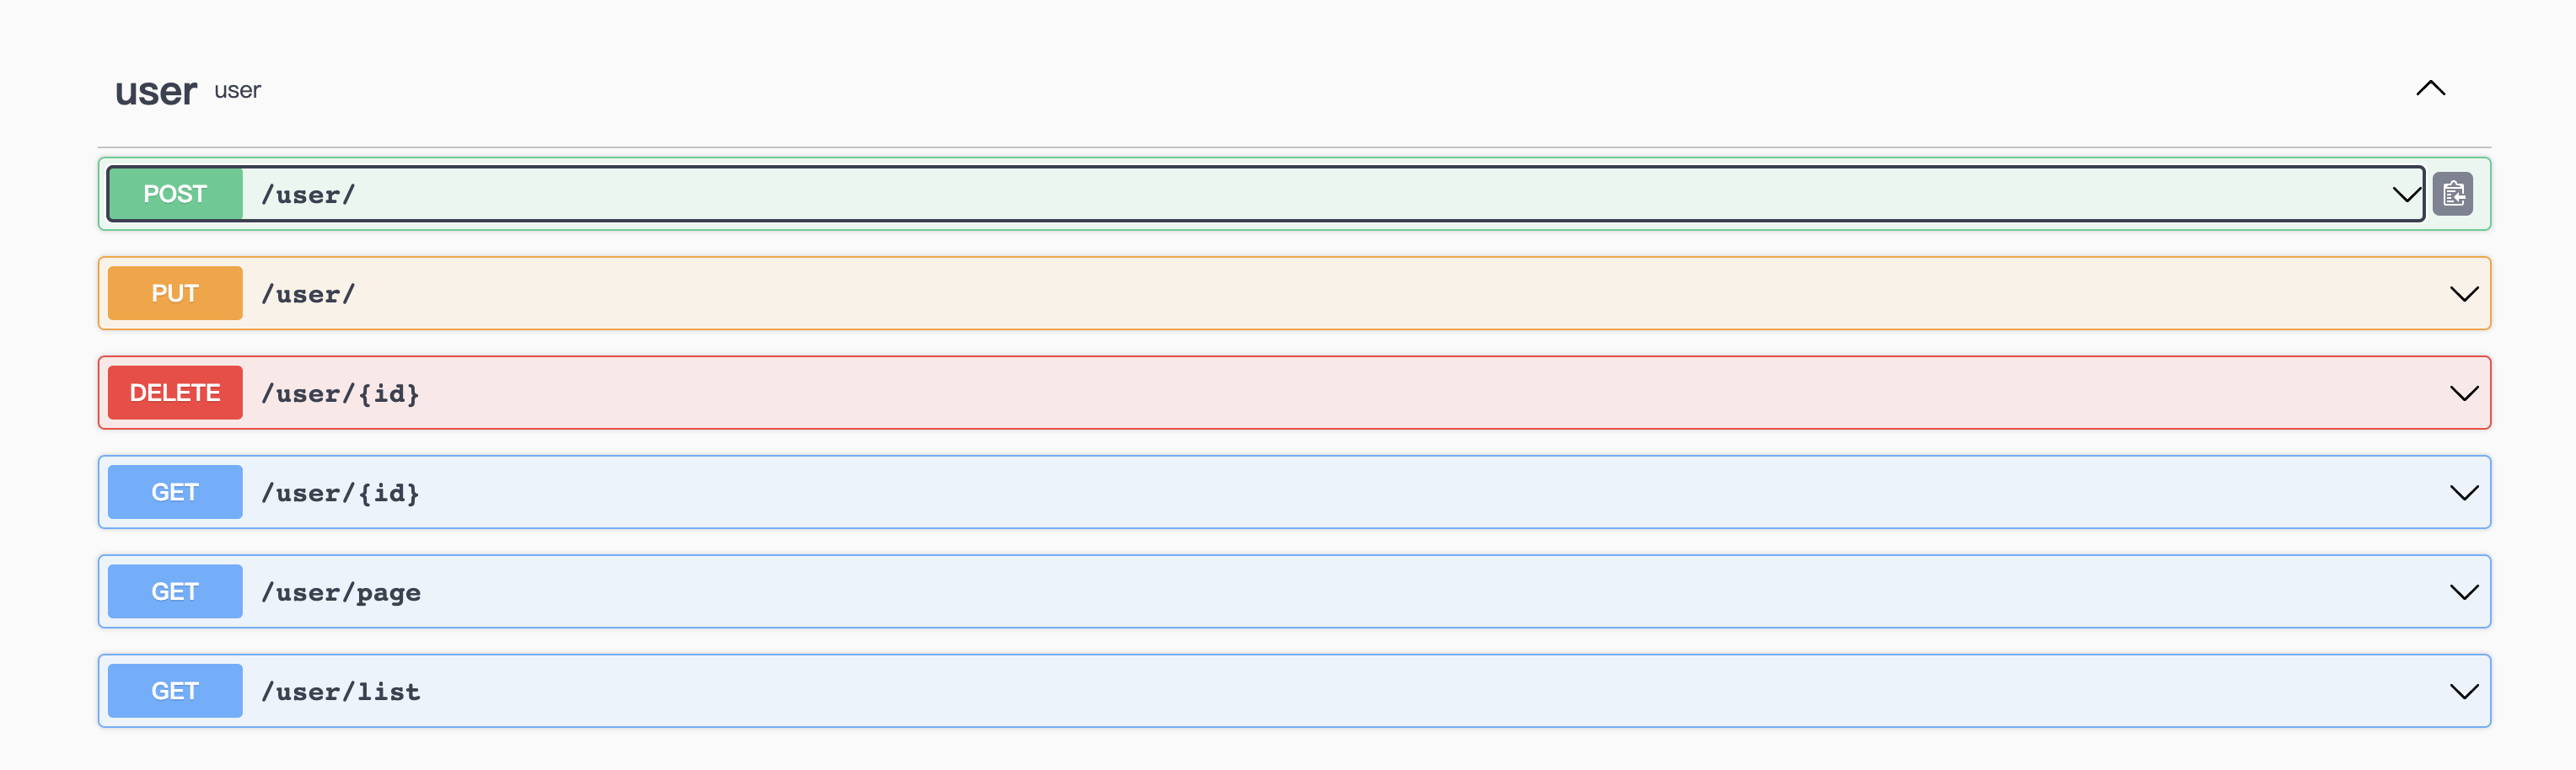

分页查询


修改数据


测试删除

再次查询id=3的已经被删除

封装常用方法
经过上面的例子,我们可以把常用代码封装一下。
封装基础entity实体类
我们可以看到实体中id、创建日期、更新日期这三个字段每个实体都会有,为了不每次都写这个,我们可以封装一个基础实体类。
// src/common/base.entity.ts
import {
  PrimaryGeneratedColumn,
  CreateDateColumn,
  UpdateDateColumn,
} from 'typeorm';

export class BaseEntity {
  @PrimaryGeneratedColumn()
  id?: string;
  @CreateDateColumn()
  create_time?: Date;
  @UpdateDateColumn()
  update_time?: Date;
}
// src/entity/user.ts
import { Column, Entity } from 'typeorm';
import { BaseEntity } from '../common/base.entity';

@Entity('user')
export class User extends BaseEntity {
  @Column({ comment: '姓名' })
  name: string;
  @Column({ comment: '年龄' })
  age: number;
}
封装基础service
// src/common/base.service.ts
import { Inject } from '@midwayjs/decorator';
import { Context } from '@midwayjs/koa';
import { FindOptionsWhere, Repository } from 'typeorm';
import { BaseEntity } from './base.entity';

export abstract class BaseService<T extends BaseEntity> {
  @Inject()
  ctx: Context;

  abstract getModel(): Repository<T>;

  async create(entity: T) {
    return await this.getModel().save(entity);
  }

  async edit(entity: T): Promise<T | void> {
    return await this.getModel().save(entity);
  }

  async remove(entity: T) {
    await this.getModel().remove(entity);
  }

  async getById(id: string): Promise<T> {
    return await this.getModel()
      .createQueryBuilder('model')
      .where('model.id = :id', { id })
      .getOne();
  }

  async page(page: number, pageSize: number, where?: FindOptionsWhere<T>) {
    const order: any = { create_time: 'desc' };

    const [data, total] = await this.getModel().findAndCount({
      where,
      order,
      skip: page * pageSize,
      take: pageSize,
    });

    return { data, total };
  }

  async list(where?: FindOptionsWhere<T>) {
    const order: any = { create_time: 'desc' };
    const data = await this.getModel().find({
      where,
      order,
    });

    return data;
  }
}
// src/service/user.service.ts
import { Provide } from '@midwayjs/core';
import { Repository } from 'typeorm';
import { User } from '../entity/user';
import { InjectEntityModel } from '@midwayjs/typeorm';
import { BaseService } from '../common/base.service';

@Provide()
export class UserService extends BaseService<User> {
  @InjectEntityModel(User)
  userModel: Repository<User>;

  getModel(): Repository<User> {
    return this.userModel;
  }
}
这样我们userService代码简单了很多
封装异常公共方法
我们上面抛异常,需要手动取new,这个我们可以封装一个公共异常类,方便使用。
// src/common/base.error.util.ts
import { MidwayValidationError } from '@midwayjs/validate';
import { CommonError } from './common.error';

export class R {
  static error(message: string) {
    return new CommonError(message);
  }

  static validateError(message: string) {
    return new MidwayValidationError(message, 422, null);
  }
}
// src/controller/home.controller.ts
import { Controller, Inject, Post } from '@midwayjs/core';
import { ILogger } from '@midwayjs/logger';
import { R } from '../common/base.error.util';

@Controller('/')
export class HomeController {
  @Inject()
  logger: ILogger;

  @Post('/')
  async home(): Promise<void> {
    // throw new CommonError('error');
    throw R.error('error');
  }
}

封装常用校验规则
import { RuleType } from '@midwayjs/validate';

// 手机号
export const phone = RuleType.string().pattern(
  /^1(3\d|4[5-9]|5[0-35-9]|6[567]|7[0-8]|8\d|9[0-35-9])\d{8}$/
);

// 邮箱
export const email = RuleType.string().pattern(
  /^[a-zA-Z0-9_-]+@[a-zA-Z0-9_-]+(\.[a-zA-Z0-9_-]+)+$/
);

// 字符串
export const string = RuleType.string();
// 字符串不能为空
export const requiredString = string.required();
// 字符串最大长度
export const maxString = (length: number) => string.max(length);
// 字符最小串长度
export const minString = (length: number) => string.min(length);

// 数字
export const number = RuleType.number();
// 数字不能为空
export const requiredNumber = number.required();

// bool
export const bool = RuleType.bool();
写一个脚本,快速生成controller、service、entity、dto文件
脚本代码很简单,内置了几个模版,然后根据传入的参数动态替换一下模版里面的变量就行。代码放在script文件夹下。
- 测试脚本
node ./script/create-module book自动生成的文件自动生成的文件
增删改查的方法自动生成了

总结
接口返回值
很多系统喜欢把返回给前端的数据统一封装,无论成功还是失败,返回的数据格式一般都会有code,data,message这三个字段,除了系统异常,其他的一些业务报错或参数校验报错返回给前端的状态码都是200。我不太喜欢这种封装,我觉得业务报错或一些其他的报错使用http的状态码都能表示了,比如业务报错,返回400,未授权,返回401,禁止访问,返回403等,像这些不是200的,可以统一返回一个数据结构。200的时候直接返回真正的数据就行了。
阅读量:2173
点赞量:0
收藏量:0